pyglet: First steps


I had to give my brain a break from all the Processing \ Android stuff and get back into Python.  I’ve done a few small apps with PyGame and it’s been an enjoyable process.  But PyGame is SDL based, and because of that never felt as ‘Pythonic’ to me as I’d like.  Plus, and this is a minor gripe, but it really rubs me the wrong way:  There seems to be no way to easily anti-alias PyGame programs.  Without that, to me, they end up looking just a bit too indy for my taste.

I thought I’d go about learning a new Python game development framework, and the one I settled on is pyglet.

Reasons I like pyglet?

  • Authored in Python with no external dependencies (other than OpenGL).  It ‘feels moar Python’.
  • It’s mainly a big fancy wrapper around OpenGL (which I want to learn).
  • I like it’s event system.
  • You can anti-alias it! :)
  • It has an even higher-level wrapper API, cocos2d (which I’ll get into later), which adds even more game-framework related abilities.

Things that bum me out about it:

  • Unless I’m missing it, has no built-in primitives library.  If you want to draw a line, or a filled circle, you gotta roll your own.  Yes, it has a ‘pyglet.graphics’ library (here, here), but it’s not exactly plug-n-play.
  • The API, while great in some areas, doesn’t have all the convenience functions I’m used to with something like Processing, or even PyGame.  But this means I get to learn how to do it, which isn’t a bad thing.
  • There is no sprite\rect-based collision systems (unlike PyGame).

So, my pyglet beginnings are below.  I tried to come up with a basic window displaying primitives, anti-aliased.  I found a great primitives library that someone already authored so that filled in my primitives hole.  And I wrote my own ‘utils’ module as I learned stuff, slowly filling in the missing pieces I think I’ll need in the future.

Links:

Here is my ‘utilities’ module:

# pyglet.utils.py
# www.akeric.com - 2011-03-17
# utils to make pyglet easier to work with, help my learning of it.

import pyglet
from pyglet.gl import *

def screenshot(name='screenshot'):
    """
    Take a screenshot

    Parameters:
    name : string : Default 'screenshot'.  Name of the saved image.  Will
        always save as .png
    """
    # Get the 'the back-left color buffer'
    pyglet.image.get_buffer_manager().get_color_buffer().save('%s.png'%name)

def getPixelValue(x, y):
    """
    Return the RGBA 0-255 color value of the pixel at the x,y position.
    """
    # BufferManager, ColorBufferImage
    color_buffer = pyglet.image.get_buffer_manager().get_color_buffer()
    # AbstractImage, ImageData, sequece of bytes
    pix = color_buffer.get_region(x,y,1,1).get_image_data().get_data("RGBA", 4)
    return pix[0], pix[1], pix[2], pix[3]

def drawPoint(x, y, color):
    """
    Based on the (r,g,b) color passed in, draw a point at the given x,y coord.
    """
    pyglet.graphics.draw(1, GL_POINTS,
                         ('v2i', (x, y)),
                         ('c3B', (color[0], color[1], color[2]) ) )

def getSmoothConfig():
    """
    Sets up a configuration that allows of smoothing\antialiasing.
    The return of this is passed to the config parameter of the created window.
    """
    try:
        # Try and create a window config with multisampling (antialiasing)
        config = Config(sample_buffers=1, samples=4,
                        depth_size=16, double_buffer=True)
    except pyglet.window.NoSuchConfigException:
        print "Smooth contex could not be aquiried."
        config = None
    return config

def printEvents(window):
    """
    Debug tool that will print the events to the console.

    window is an instance of a Window object receiving the events.
    """
    window.push_handlers(pyglet.window.event.WindowEventLogger())

def playMusic(music):
    """
    Simple wrapper to play a music (mp3) file.

    music : music file relative to application.
    """
    music = pyglet.resource.media(music)
    music.play()

def setBackgroundColor(color):
    """
    Color is a list of four values, [r,g,b,a], each from 0 -> 1
    """
    pyglet.gl.glClearColor(*color)

And here is my ‘basic window’ which draws primitives. It is a dupe of the primitives drawing example from the primitives.py module, but modified into a new window:

# primitivesTest01.py
# www.akeric.com - 2011-03-17

import sys
import random
import pyglet
from pyglet.gl import *
import primitives # module discussed above
import utils # module from above

FPS = 60
smoothConfig = utils.getSmoothConfig()

class PrimWin(pyglet.window.Window):

    def __init__(self):
        super(PrimWin, self).__init__(fullscreen=False, caption='Primitives Test!', config=smoothConfig)
        glEnable(GL_BLEND)
        glBlendFunc(GL_SRC_ALPHA, GL_ONE_MINUS_SRC_ALPHA)
        self.p = primitives.Pixel(10,10)
        self.c = primitives.Circle(200,100,width=100,color=(0.,.9,0.,1.))
        self.a = primitives.Arc(150,150,radius=100,color=(1.,0.,0.,1.),sweep=90,style=GLU_FILL)
        self.P = primitives.Polygon([(0, 0), (50, 200), (80, 200),(60,100),(100,5)],color=(.3,0.2,0.5,.7))
        self.l = primitives.Line((10,299),(100,25),stroke=8,color=(0,0.,1.,1.))
        # Setup debug framerate display:
        self.fps_display = pyglet.clock.ClockDisplay()
        # Schedule the update of this window, so it will advance in time at the
        # defined framerate.  If we don't, the window will only update on events
        # like mouse motion.
        pyglet.clock.schedule_interval(self.update, 1.0/FPS)

    def on_draw(self):
        # Window event
        self.clear()
        self.c.render()
        self.p.render()
        self.a.render()
        self.P.render()
        self.l.render()
        self.fps_display.draw()

    def on_mouse_motion(self, x, y, dx, dy):
        # Window event
        self.c.x = x
        self.c.y = y

    def update(self, dt):
        # Scheduled event
        self.a.rotation+=1
        self.c.color = [random.random() for i in xrange(3)]+[1]

if __name__ == '__main__':
    PrimWin()
    sys.exit(pyglet.app.run())

And the result of this awesome code is the screenshot at the top of the screen.

Next steps will be to dig more into cocos2d and see if I can come up with something more interesting than the above screenshot to develop.

New theme, if you haven’t noticed…

No, this isn’t a different blog, same one as before, thought I’d try a more simplified theme (monochrome), to cut down on some of the visual clutter.  Cary on…

Verlet physics in Processing

I randomly came across two great tutorials (one, two) by Florian Boesch detailing verlet physics.  His examples were done in JavaScript, and as a learning exercise I ported them to Processing.  The below images link to the pages on my blog where you can launch the interactive Processing applets and grab the Processing source code.

Arduino to Maya Communication via Python

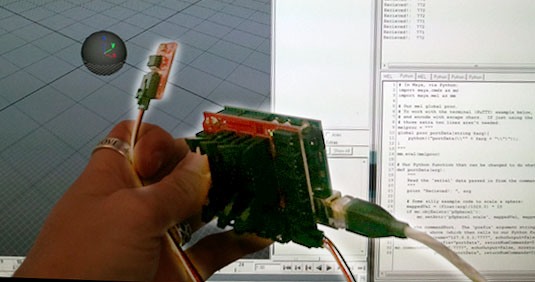
Arduino + light sensor talking to a sphere in Maya

I’ve wanted for some time to get my Arduino to talk with my 3d application of choice, Maya.  There were a few hurdles to overcome first:

  1. The Arduino communicates to the computer over the serial port (easily, by default).
  2. Maya (to my knowledge), has no built-in serial communication.  If you can find a built in mel command or API call, let me know 😉
  3. Maya comes with its own version of the Python scripting language (2.6ish)
  4. Python (external to Maya) has it’s own (separately installed)  pySerial module.  BUT:
    1. pySerial is a 32-bit app  (no 64-bit build I can find, and I’m not smart enough to recompile it to 64-bit).
    2. I’m running a 64-bit version of Maya, with a 64-bit version of Python = I can’t use pySerial in Maya :-(

Maya can however receive incoming communication over a commandPort, which you can ‘pretend’ is a serial port.  Below I’ll describe how to do that.  A bunch of these steps I’d already discussed in previous blog posts here or on my mel wiki, which I’ll list individually first:

Overview of the process:

  1. Author Arduino code to read sensor data and send it over the serial port.
  2. Author Python code in Maya (Maya’s version of 64-bit Python 2.6) to setup a commandPort, and to do ‘something’ with the incoming data.
  3. Author Python code external to Maya (in 32-bit Python 2.6) to receive the Arduino serial data (using pySerial), and broadcast it to the open Maya commandPort.

Notes about the commandPort code below:

  • I’ve hard-coded the commandPort data below to the address of  “127.0.0.1:7777”.
  • 127.0.0.1 is the localHost address of your machine, you shouldn’t change that.  But the “7777” is an arbitrary port number I made up, feel free to change it.
  • The important thing is that it must be consistent in all the places referenced in the code below.

Step 1:  Author Arduino Code:

This is a very simple sketch showing you the bare-bones requirements. In my case, I’ve hooked up an analog sensor to pin 5 (in my case, it’s a light sensor).
Upload this to the Arduino and start broadcasting!  You can open the Arduino Serial Monitor to see what it’s up to, but be sure to close the monitor before you do any other work.

/**
SerialSend01
Eric Pavey 2011-01-26

Sketch will print the value from the sensor to the serial port.
Sensor is plugged into analog pin 5
*/

#define SENSOR 5
int val = 0;

void setup(){
  Serial.begin(9600);
}

void loop(){
  val = analogRead(SENSOR);
  // Print to the serial port:
  Serial.println(val);
  delay(100);
}

Step 2: Author Python code in Maya:

The below code could eventually be made into a well-packaged Maya-Python module, but for the time being you can just paste it into the Script Editor for execution.  Thing to note:

  • The Maya commandPort command has a ‘prefix’ parameter that takes the name of a mel procedure (not Python function) that can intercept the incoming data.  Because of this, we use Python to create a simple wrapper mel procedure that in turn calls to the Python function that does the work.
  • In the below example, I have the Python function query for the existence of a ‘pSphere1’ object in Maya, and if it finds it, will scale it based on the passed in Arduino sensor values.  This should obviously be changed to something way more cool for what you’re doing :-)
# Eric Pavey - 2011-01-26
# In Maya, via Python:
import maya.cmds as mc
import maya.mel as mm

# Our mel global proc.
melproc = """
global proc portData(string $arg){
    python(("portData(\\"" + $arg + "\\")"));
}
"""
mm.eval(melproc)

# Our Python function that can be changed to do whatever we want:
def portData(arg):
    """
    Read the 'serial' data passed in from the commandPort
    """
    print "Recieved!: ", arg

    # Some silly example code to scale a sphere:
    mappedVal = (float(arg)/1023.0) * 10
    if mc.objExists('pSphere1'):
        mc.setAttr('pSphere1.scale', mappedVal, mappedVal, mappedVal)

# Open the commandPort.  The 'prefix' argument string is calling to the defined
# mel script above (which then calls to our Python function of the same name):
mc.commandPort(name="127.0.0.1:7777", echoOutput=False, noreturn=False,
               prefix="portData", returnNumCommands=True)
mc.commandPort(name=":7777", echoOutput=False, noreturn=False,
               prefix="portData", returnNumCommands=True)

Step 3: Author Python module to receive Arduino serial data and broadcast to Maya:

You must make sure you’ve previously downloaded and installed pySerial to a place where your system-installed Python can see it.  And it goes without saying you also need to have Python 2.6 installed as well.

This code will intercept the Arduino serial data, and send it to Maya over the commandPort.  It will only send new data, meaning, it will only send data that has changed from the previous data received.

# arduinoRead.py
# Python module external to Maya
# Eric Pavey - 2011-01-26

import socket
import serial

ARDUINO =  "COM3"

def main():
    maya = socket.socket(socket.AF_INET, socket.SOCK_STREAM)
    maya.connect(("127.0.0.1", 7777))
    ser =  serial.Serial(ARDUINO, timeout=1)
    prevVal = None
    while 1:
        # Read the serial value
        ser.flushInput()
        serialValue = ser.readline().strip()
        # Catch any bad serial data:
        try:
            if serialValue != prevVal:
                # Print the value if it differs from the prevVal:
                maya.send(str(serialValue))
                prevVal = serialValue
        except ValueError:
            pass

if __name__ == '__main__':
    main()

Save the above code as a Python module, and then execute it from a shell:

c:\pythonStuff\python arduinoRead.py

This should form the link between the broadcasting Arduino, and the listening Maya session, converting from serial data to data sent over Maya’s commandPort.

Result:

In Maya, make a sphere, and rename it to ‘pSphere1’ if it’s not already.  If all the code is working, you should see the script editor print the received Arduino data whenever it changes, and you should see the scale of your sphere be effected by that data.  Magic!

Android Adventures, part 8: On a Mac?

Back to part 7.5…

I started using Apple’s back in the early 80’s:  Staying up late at my friends house playing Wizardry (1) on his Apple ][+ in ’81 was a great time.  My family picked up an Apple ][c in the mid 80’s which lasted for many years.  But by the late 80’s we jumped on the PC bandwagon, and it was a steady stream of 286’s, 386’s, 486’s, Pentium’s, etc,… up until today where I’ve had a Dell laptop for the past six years.  It treated me well, but has been showing it’s age.

Time to get a new laptop.  Doing my research, I learned the majority of the tech-friends I respect all vote for Mac.  Mac?

Long story short:  Now have a nice new shiny Macbook Air.  Easily portable, solid state drives, and feels nice in your hand.  Time to get software!

Below is the process I went through getting the Android SDK on the machine, getting ‘Processing for Android’ on it, and all the confusion that went on in-between considering I’m a complete mac noob.  This is actually very similar to “Android Adventures, part 2” where I configured everything on my PC, but with some twists.

A.  Install Software to get ‘Processing for Android’ working:

  • Per the instructions on the ‘Processing for Android’ page, I installed:
  • The Java Development Kit.  Wait, no I didn’t.  The mac comes pre-loaded with that.  Of course I didn’t know that and took me an hour or so to grasp it.  It also comes pre-loaded with Python, Ruby, and many other things.  My PC didn’t come with any of that….
  • Downloaded Android SDK for mac, and installed it.  Since this wasn’t a .dmg, but a zipped dir, I had to do research on where to put it.  Ultimately I renamed the folder it came in and:
    • Stuck it here  /Users/ak_eric/Documents/android-sdk
    • Had to edit my ~/.bash_profile adding these two lines: (there was already an export line for the PATH)
      • PATH=${PATH}:/Users/ak_eric/Documents/android-sdk/tools:/Users/ak_eric/Documents/android-sdk/platform_tools
      • export ANDROID_SDK=/Users/ak_eric/Documents/android-sdk
  • Download ‘Android for Processing’ for the mac.  This is where everything really went wrong:
    • My Android phone is still on os 2.1, which runs the SDK 7 tools.  Reading the download notes, it looked like to me I needed to download ‘Processing for Android’ revision 0191, since that seemed to mesh with SDK 7.  As it turns out, no, I was wrong, I needed to download the latest version.  After that everything started working.  But it took me several days of trial and error to figure this out.  You can see the forum thread on the subject here.

B.  Try out some code:

  • I’d already brought over all my old processing sketches.  During my ‘trial and error’ period mentioned above trying to get Processing for Android working, I downloaded the adbWireless app (which I blogged about previously).  I now use that exclusively to send my Processing for Android apps over to the phone, works great.  No more zany USB configuring for me!

So while it did take me quite a few days to get the whole thing working, it was mainly due to my lack of knowledge of the mac, and failing to install the latest software.  So far the Macbook Air has been a great reintroduction to the world of Apple, I just hope it lasts as long as my Dell 😛

Back to part 7.5…