Playing with the Raspberry Pi’s camera
I recently picked up a camera module for the Raspberry Pi from Adafruit. This post will serve to be notes to myself on how to use the dang thing. There’s a lot of info on the web, so I’m going to collect what’s applicable to myself here. This post will continue to evolve over time.
Note, I’m using a Macbook Air, so all software and commands are centric to OSX (10.8.5).
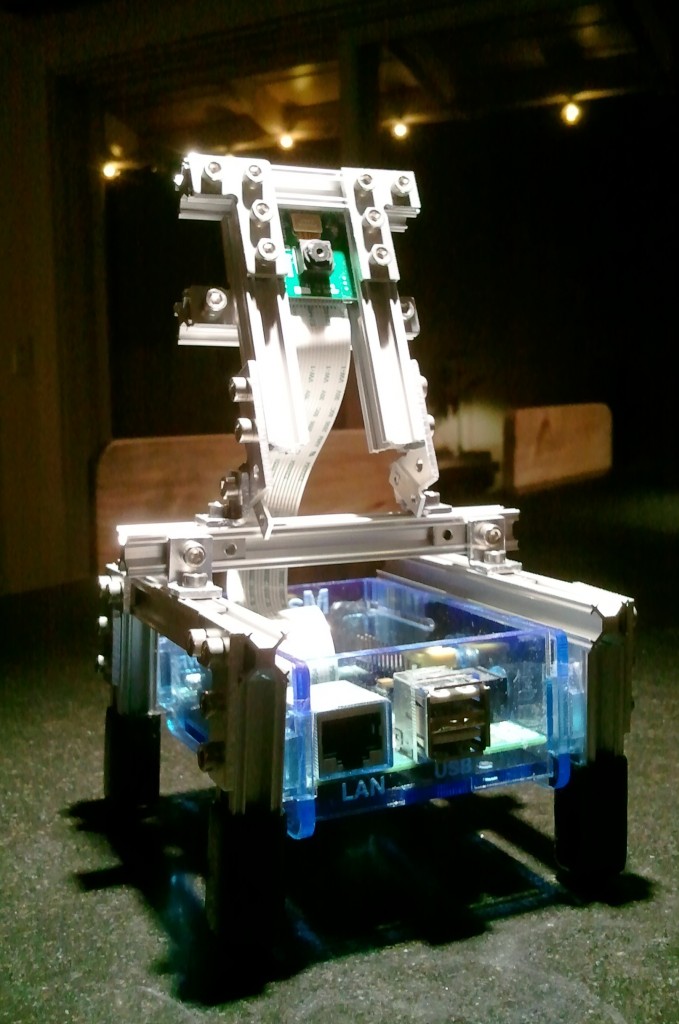
First off, you need some sort of stand for it. I made one that should survive the Zombie Apocalypse out of some MicroRAX:

First Time Setup:
Based on the latest installation of Rasberian via NOOBS, the hardware installed easily, and was auto-detected by the Pi. First time setup can be found here on raspberrypi.org.
Documentation:
Official documentation can be downloaded off of Github. The first time setup above covers many basics.
Camera forum can be found here.
Capturing and Viewing:
Important note: You can’t view anything over VNC, and obviously you can’t do it via a ssh terminal. This post explains the reasons behind it. This is however, a bummer: To run any of the “demo” code, you need to be viewing the Pi directly over hdmi.
Super Simple Commands:
You’ll find these on all the sites:
$ raspistill -o image.jpg
$ raspivid -o video.h264
$ raspivid -o video.h264 -t 10000
1 : Capture an image
2 : Capture a (5 second, default) video, at 1920×1080 (1080p)
3 : Capture a 10 second video (in milliseconds)
Viewing a video stream from the Pi on your Mac:
Need to instal mplayer on the Mac so you can access it from the command-line. The best luck I had was to install it via macports.
$ sudo port selfupdate
$ sudo port install mplayer
Now, thanks to a post by spudnix from this thread, here’s how you can stream video from the Pi to your Mac:
Mac shell code to start netcat listening to port 5001, and piping that to mplayer:
$ nc -l 5001 | mplayer -fps 31 -cache 1024 -
Pi shell code to start streaming vid and pipe it to netcat on port 5001, shooting it to the mac’s local ip:
$ raspivid -t 999999 -o - | nc 192.168.2.15 5001
There’s a few second lag, but it worked right away. My guess is the lag is because of the full 1080p signal being broadcast. Dropping the resolution down had some lag at first, then caught up after a few minutes, odd:
$ raspivid -t 999999 -o -w 640 -h 480 - | nc 192.168.2.15 5001
Record raw video, convert to mp4, play:
The h264 video the camera records is “raw”. To make it easily viewable by the Pi or Mac (or other PC’s) it needs to be converted. Thanks to this post, here’s how you can do it:
First, you need to install gpac on the Pi, then run MP4Box (part of that install) to do the convert:
$ sudo apt-get update
$ sudo apt-get install -y gpac
$ MP4Box -fps 30 -add myvid.h264 myvid.mp4
To play video on the Pi, you need omxviewer. I think it may come installed iwth NOOBS now(?), but if not:
$ sudo apt-get install omxplayer
Then play in a window (again, this doesn’t work over VNC, need to be on a monitor connected to the Pi) or to the HDMI port:
$ omxplayer myvid.mp4
$ omxplayer -p -o hdmi myvid.mp4
Copy data from the Pi to the Mac:
Once you record a nice video, how do you get it to your PC? Presuming you have a ssh connection, execute this from a shell on your Mac, to copy the data from the Pi, to the Mac:
$ scp user_name@the_pi_ip:/path/to/source/file/on/pi /path/to/destination/file/on/pc
For example:
$ scp pi@192.168.2.27:~/piVid.mp4 ~/macVid.mp4
Broadcast video to the Internet:
Using VLC
Thanks to this post, I was able to get the Pi cam streaming to the web, and viewable on my Mac (via the “middle” option they described). It wasn’t entirely straight forward though, so these are the steps I went though:
Install VLC:
On the Pi, it’s easy:
$ sudo apt-get install vlc
On the Mac, at first, I tried to install it via Macports like so:
$ port install vlc
It took forever. And while vlc was then available at the command line, it kept giving me missing plugin errors. I found a App for it in my downloads folder (which I moved to Applications) and tried via the gui to “File -> Open Network…” : But it wouldn’t recognize the stream from my Pi (info below). Soooo, I went to the official download page here, installed the App that way, and it started working!
Port Forward the Router:
I accessed my routers web page 192.168.x.x and via the “virtual servers” option, opened up port 8554 for outside listening. I’m sure this process can vary widely per router.
Stream from the Pi:
After ssh’ing into the Pi, I executed this to start the video stream (note I knocked down the resolution from the default 1080p):
$ raspivid -w 640 -h 480 -o - -t 9999999 |cvlc -vvv stream:///dev/stdin --sout '#standard{access=http,mux=ts,dst=:8554}' :demux=h264
View via VLC:
I accessed “What’s My Ip” to find the external IP of my router.
Launching VLC, I accessed “File -> Open Network…”, and entered:
http://<ip of my router>:8554
And hit “open” : Next popped up a (delayed by about 5 seconds) stream from my Pi’s cam. Awesome.
Using MJPG-Streamer
It’s slightly more involved, but this tutorial shows how to broadcast video straight to a web page via MJPG-Streamer. All things considered, it’s really easy to setup. I followed the tutorial my Miguel Mota, and it worked the first time I tried. Nice! : “Raspberry Pi camera board video streaming”
Miguel made two shell scripts, start_stream.sh & stop_stream.sh that handle all the heavy lifting of starting and stopping all the services: Make a copy of them to your home dir for easy execution. Note, I changed them to up the resolution, jpg quality, and add a password to the site. I only made one change: Since I previously port-forwarded port 8554, I also changed their code to use that port, rather than 9000.
To add your own password, edit start_stream.sh and change the line including the block of code below to include the “-c” stuff shown here, changing myUserName:myPassword appropriately. Note, the -c argument must be inside the quotes, after the www, or things won’t work so well.
-o "output_http.so -p 8554 -w /opt/mjpg-streamer/www -c myUserName:myPassword"
Then browse to:
http://<ip of your router>:8554/stream_simple.html
To login and start watching from the auto-generated web page! Looks like I’m getting around 1fps.
raspistill Image Formats
--encoding <format>
The default is jpg, but you can change it, where <format> is jpg, bmp, gif, & png. From the docs: “Note that unaccelerated image types (gif, png, bmp) will take much longer to save than JPG which is hardware accelerated.”
If using jpg, you can set the quality via:
--quality #
Where # is a value from 1 -> 100. They say that 75 is a good number.
Python Bindings
picamera
Here on PyPi. Official documentation here. Source on Github here. Forum discussion here.
Easy to install with pip:
$ sudo pip install picamera
I’ve successfully ran the quickstarts via Adafruit WebIDE successfully (while having the Pi hooked up over HDMI to preview the results).
picam
Homepage here. Source on over on Github. It returns PIL Image objects.
$ sudo pip install https://github.com/ashtons/picam/zipball/master#egg=picam
Project Links:
- Raspberry Pi as a low-cost HD surveillance camera
- OpenCV and the Pi Camera Board! (looks like you need to follow this if you want to use the camera for OpenCV projects)
- Need moar!
