Modular Panel System & new garage shelving
Overview
I’ve had the idea for sometime to create a new shelving unit in our garage: When we moved it we tossed some spare Ikea shelves against the wall. Wasn’t the best use of space.
Rather than go looking for a pre-built solution, I figured this would be a great learning experience: Make an entire shelving unit from scratch, including all the parts that join it together. At first I thought I’d use my X-Carve CNC for this, but after much research and though, I instead decided to create a new 3d-printed modular corner bracket system to hold 3/4″ plywood sheets together. While creating it, more 3d printed items were needed, so I decided to coin the whole operation the “Modular Panel System“, or MPS. As of this authoring the system includes:
- MPS – Corner Clamp
- MPS – Shelf Support
- MPS – Shim
This blog post describes the process I went through to create the MPS, how you can use them, and the shelving unit I designed to prototype it all with.
Disclamer
This is all common sense, but because lawyers: I am not responsible in any way for any type of accident, damage, injury, death, or cost incurred from using this system: By downloading from any source and / or making these files on any printer / fabrication system, you wave me from from any liability now or in the future. Be smart, use at your own risk, test.
File Download
You can download all the above-mentioned MPS 3d printable files on Thingiverse HERE.
The End Results
Pretty pictures first:
The 3d Printable Parts
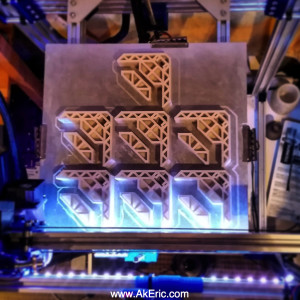
All the 3d printable parts I printed on my C-bot.
Corner Clamps
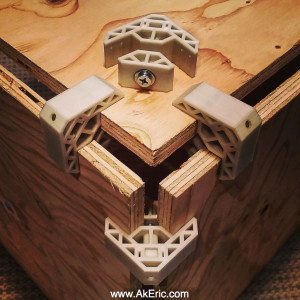
The Corner Clamps are what hold two pieces of plywood together at 90 deg angles. By using them in different configurations, you can create just about any rectangular-shaped structure.
Prototyping the Corner Clamps
I wanted an adjustable bracket to hold plywood together at 90 deg angles. Since plywood can have varying width, I needed a solution that allowed for that slop. I’d seen some interesting brackets at Maker Faire one year that did something similar, so I got to prototyping a system: An outer L-shaped piece that could have an inner piece cinched against it, taking up any slack. This was my initial prototype modeled in Autodesk Maya:
The idea is you put a nut in the outer L-shaped piece, and a screw through the end of the inner piece to hold it in place, and both sides press against the plywood. Prototype was ‘strong like bull’ to humans, and my hope was the dense infill would provide the internal strength it needed, but I quickly broke it when torquing the held plywood. However, it was still really strong, so I went about a redesign.
Stress testing, & Corner Clamp prototype 2
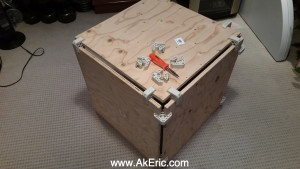
Based on where the cracks had formed in my prototype I redesigned it to use less material, but put what was there all in the right places. From there I printed a number of them, assembled a small plywood box out of them, and started bouncing on top if it:
With only one bracket per side (less that in the above shots), four of them could easily hold my bouncing 180lb frame. I found this encouraging.
Corner Clamp Final Design
At this point, I realized I had purchased 1/2″ plywood for my above tests: For my final shelving unit I wanted to use 3/4″ ply, to provide more strength. Because of this I went through one more iteration, requiring me to enlarge the brackets significantly to handle the increased width of the plywood:
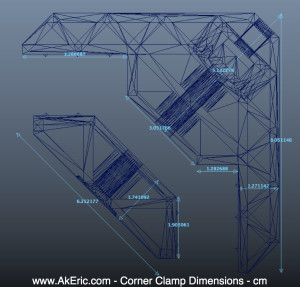
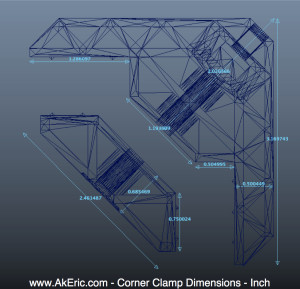
Corner Clamp Dimensions
The below images show the overall dimensions of the parts in both inch and cm. When I first started making them they had nice round numbers. But that very quickly went off the rails as design needs were encountered.
And to help with design, when two corner clamps are holding plywood opposite one another, the gap is just about 2″:
3d Printing the Corner Clamps
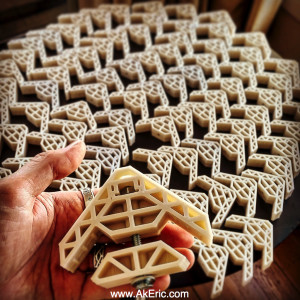
I print mainly in PLA: I had used a couple different types during prototyping, and around that time I learned about MakerGeeks Raptor Series PLA : It’s supposed to be stronger than ‘normal pla’, and while I have no numbers to back up my findings, it does seem much stronger than ‘normal’ pla. It’s more pliable, less brittle. Based on that I bought 8 spools (enough I’d need to print the 100ish brackets, supports, and shims):
And got to printing:
Corner Clamp 3d Print Settings
These are the settings I used to print them in Simplify 3D, based on the Raptor PLA using a .6mm nozzle. If you’er using a .4mm nozzle you’ll need to compensate for the layer height and number of roof\floor\shells.
- .6mm E3d-v6 volcano nozzle
- 300 micron z-height
- 90mm\sec
- 230c extruder, 60c bed.
- 6 floor, 6 roof, 0% infill.
- Based on my nozzle diameter, 4 shells completely filled all the structures.
- No raft, nor brim, no supports, did use a offset skirt.
- Be sure to print them flat, not up on one end. They’re designed to be printed flat, to provide maximum strength based on those layer lines.
They came to 68g for both pieces, and took about 70 min. Which means I could print 14 per 1kg spool. So, I’d do 7 at a time on my c-bot’s 12×12″ bed: One over night and one while I was work (monitored via OctoPrint), allowing me to print 14 (one spools worth) a day.
Other notes:
- If during assembly you can’t get the washer or nut inserted, it’s likely your printer is over-extruding. If it’s tuned properly, they should drop right into place with minimal to no pressure.
Corner Clamp Print Cost
I paid around 35$ per spool for the Raptor Series PLA. For 68g of material, that works out to just about $2.40 per Corner Clamp for the raw materials.
Corner Clamp Initial Assembly
Tools required
You’ll need:
- A philips head screwdriver.
You may want:
- An electric drill with 1/4″ bit.
Hardware required
I purchased all of this at my local “Orchard Supply Hardware”.
Per Corner Clamp:
- 1 Philips flat-head machine screw (or equivalent) : 1/4″-20 x 3″ – K
- 1 Hex Nut : 1/4″-20 – K
- 2 Flat Washers : 1/4″ – K
Assembly Instructions
- Insert a 1/4″ washer and 1/4″ hex nut into the L-shaped outer-clamp. They should drop in easily.
- If they’re too tight to fit, there’s a good chance your printer is over-extruding.
- Insert a 3″ long 1/4″ machine screw screw through a 1/4″ washer, and insert that through the smaller inner-clamp.
- If it’s too tight to easily slide through, you can easily enlarge the hole with a 1/4″ bit on an electric drill. I used this method often…
- Optionally you can simply thread the screw through the plastic. This will give you more holding power (not sure if that is necessary though), but a lot more manual twisting.
- Push the machine-screw through the larger bracket, into the nut, and continue to tighten until the tip of the screw just pokes through the nut. That should give you ample space to later fit the plywood in both sides.
Shelf Supports
The Shelf Supports are used to hold up… shelves. They are simply triangular supports that are placed under a flat piece of plywood, and screwed into the plywood being held by the Corner Clamps.
3d Printing the Shelf Supports
These are the settings I used to print them in Simplify 3D, based on the Raptor PLA. If you’er using a .4mm nozzle you’ll need to compensate for the layer height and number of roof\floor\shells.
- .6mm E3d-v6 volcano nozzle
- 450 micron z-height
- 60mm\sec
- 230c extruder, 60c bed.
- 4 floor, 4 roof, 0% infill.
- Based on my nozzle diameter, 4 shells completely filled all the structures.
- No raft, no brim, did use an offset skirt.
- Supports are needed: Since these are printed flat, and not on end (to give them max strength), you’ll most likely need supports to hold one of the sides up, unless your printer is a monster at printing bridges.
Shelf Support Assembly
Tools Required
You’ll need:
- Philips Screwdriver (magnetic head is handy).
You may want:
- Electric drill with Philips bit (magnetic head is handy).
Hardware required
I purchased all of this at my local “Orchard Supply Hardware”.
Per Shelf Support:
- 2 Philips Flat Head Wood Screw (or equivalent) : 10 x 3/4″ – K
- 1 Flat Washer : 1/4″ – K
Assembly Instructions
- With the side that has the slot facing down, slide a 1/4″ washer up to the top of the support.
- With a screw on your driver, thread it through the washer, and into the plastic slot just until it catches.
- Just start the other screw into the other hold as well. Note, not all supports need this screw: I only usually have two per shelf. They’re just there to keep the shelf from shifting one installed.
- You can leave it in this state until final shelf assembly.
Here’s how it looks assembled in place. Note, the screw I have in the top is not what I reference above.
Shims
Since plywood can have varied thickness, this can have an effect on the overall assembled shelving unit. For Corner Clamps that hold vertical sections, I noticed they wouldn’t always touch the plwood under them, putting an unnecessary strain on their horizontal bits. I designed these simple shims to be placed on top, or under a Corner Clamp, to help take up the slack, and help distribute the weight more evenly.
Here, you an see two shims in action, on place on top of a Corner Clamp, and the other underneath one:
3d Printing the Shims
Just print them completely solid. I made a bunch and used them liberally as needed. You can make your own by taking what I provided and scaling it by any amount in your slicer software (presuming it has that ability)
Garage Shelf design
This section describes the shelf I designed that made use of all the above Modular Panel System pieces.
Digital Design
At the same time I was designing the Modular Panel System, I was also designing the shelf to prototype it on in my garage. I used Autodesk Maya for this : Yes, there is probably much better software out there for this sort of thing, but I know Maya best, so it was the software of choice.
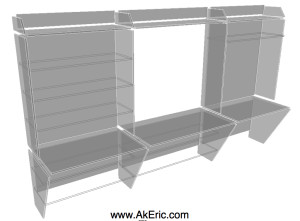
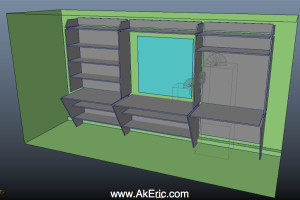
After measuring my space, I went about mockup up what I’d think the shelving unit would look like in 3d:
All the solid pieces are what will be assembled using the Corner Clamps, and all the gray-outline ones will be held with the Shelf Supports.
Plan Creation
After I (and the Mrs) was happy with the design, I did a manual space-fitting operation in Maya: I laid all the panels down into shapes that match 4’x8′ pieces of plywood. This both let me know how much plywood I had to buy, and how to make all my cuts. Since the Mrs asked that all flat pieces were pained white on top, I also called out that in my plan:
This also led to some design changes: I had some shelves that were just over 4′ long: If I could make them fit 4′, then I could maximize my material. Based on that, I deduced I needed 9 sheets of plywood.
Cutting & painting the plywood
I ended up getting 3/4″ sanded pine plywood. Has a nice smooth pine veneer on both sides that required no sanding on my part. 9 sheets @ $30 a sheet = $450 in plywood.
Based on my above plans, I’d measure out each cut, and get to it with my circular saw:
4+ hours later, I had this pile:
Which the boy and I spent a couple hours sanding all the cut sides on. Whew…
From there, all the horizontal parts got laid out on plastic in my yard, and I rolled on the paint:
A few days later the paint had dried, and final assembly could ensue…
Garage Shelf Assembly
It took a whole weekend to just get rid of all the existing stuff on that wall of the garage. So the next weekend, with the occasional help of my wife and son, the new shelf was assembled. Guessing it took around 6 hours, which included extra fabrication like cutting holes for electrical plugs, and other gotchas. But for the most part it wen off without a hitch. To do something this size, and extra pair of hands is really handy. BTW, 3/4″ plywood is… heavy.
Special note : Before assembly, I used my stud-finder to figure out where on the wall the studs were: On the large, back-pieces of plywood facing your, I used 3″ wood-screws to anchor them directly into the studs post-assembly. I’m in California, earthquake territory.
Installing Corner Clamps
This was the method I used:
- It will vary based on what section of the shelf you’re assembling,but the general process goes:
- Make sure the machine-screw is loose enough so you can get plywood on either side of the clamp. Or, if you’re attaching a clamp to an already assembled section, you can completely unscrew it, put the pieces on either side of the corner, and then re-thread the screw.
- I use a screwdriver to tighten it up: I watch the plywood on either side “suck” up into position. While tightening, I make sure the plywood is pressed up flush against the middle of the bracket, so there’s no gaps exposed.
- On a large section with many Corner Clamps, I’ll leave them all slightly loose until all are in place, square up the section, then tighten each one.
- Don’t forget to add shims in where needed, before you tighten everything up, and before you put a load on the shelf.
How many Corner Clamps to use per section?
For the above shelving unit, I used two Corner Clamps to hold each side of each section. For example, for the middle desk table by the chair, it had two clamps on the left, two on the right, but based on it’s length, three on the back. It’s all based on the sizeof the shelf, an the load it will be holding. If in doubt, add more. You can always safely add more.
How tight should I make the Corner Clamp?
Tight enough, but not too tight?  I never actually broke one from tightening, but very quickly I got a feel for how tight I thought it should be. If you hear it start to crack either you’ve tightened way to much, or you have a bad print.
Installing Shelf Supports
This was the method I used:
- I first marked where the top of each Shelf Support should be.
- With the screw just barely poking out the back, I held the Shelf Support in-place on the wall, and used my screwgun to tighten it up.
How many Shelf Supports should I use per shelf?
For the above shelving unit, I used two on either side of each shelf, and 2-3 on the back based on their length. Again, it’s entirely based on what they’ll be holding. If you’re going to fill them with books I may place one ever 6″.
How tight should I make the Shelf Support?
For the screw that goes into the wall, through the washer, I cinch it up with my drill until I can no longer twist the bracket back and forth. For the screw that goes up into the piece of wood above it, this can be left nearly loose: I tighten until the screw head his the plastic and I stop. If you over-tighten that one, you can split the bracket. And it doesn’t need to be tight to do its job.
Total Shelf Cost
Rough figures:
- 9 Sheets of plywood at $30 a sheet: $270.
- 8 rolls of filament at $35 a roll: $280. Used nearly all of it, but that’s also counting print failures that happened as well.
- Various nuts, bolts, washers: $30 (estimate)
- Can of paint: $15.
Total: Just under $600.
Final Thoughts
Was a great experience. Was a lot of work. Was hopefully cheaper than buying Ikea shelving 
As of this blog post the shelving has been installed for three weeks, fully loaded with stuff, and nothing yet has broken. It’s my hope you can uses these files, tools, and ideas to aid in your own creativity. And always, be safe!


