Posts Tagged ‘ marlin

Howto: Pause Marlin for filament reload at a specific layer number

I’ve had fun in the past printing maps with water (SF Bay, Oahu) : Using my Replicator 1 & it’s Sailfish firmware, it was easy via the LCD to set a specific layer number to pause at:  Doing this, I’d calculate which layer the print transitioned from water to land, pause it there, and swap filament.

Marlin firmware (which is on my C-Bot) gives you no such feature via the LCD :  Which means you have to monitor the print, and when it appears land is printing, you quickly pause the bot, go through the manual steps (via the LCD) to lower the bed, possibly move the hotend out the the way, and do the reload.  Afterwards (via the LCD) you have to get everything back into position. Awkward.  I am aware that the latest cut of Marlin allows for filament reload via the LCD:  I’ve been unable to get it to work.  And even if it did work, it’s still not accurate enough since I’m guessing at the layer to pause at.  There must be a better way!

There is:  You can directly edit the .gcode to insert a chunk that will do exactly what you need:  Lets say you want to pause just before layer 2 starts:  You’d find the line starting with the layer change comment…

; Layer 2

in your .gcode file, and then paste this right above it (I’ve included the layer change comment in the below code, plus comments for what the commands are doing):

G91                  ; Put in relative mode
G1 Z10               ; Lower bed by 10mm
G90                  ; Put back in absolute mode
G1 X0 Y0             ; Zero (home) the X & Y
M0 Click To Restart  ; Pause and wait for the user
G91                  ; Put in relative mode
G1 Z-10              ; Raise the bed back up 10mm
G90                  ; Put back in absolute mode
; layer 2, Z = 0.45

Works like a charm :)

If your slicing software supports post-processing of the gcode, it’s possible you can do this work directly in the slicer.  I slice using Simplify3D:  In a given process, it has a section in its ‘Scripts’ tab, at the bottom, called ‘Additional terminal commands for post processing’.  This allows you to enter in script to do a text-replace in your file, to edit it for you.  I learned about it on a forum post here.

To do the above using that system, you’d need to enter this text into that field:

{STRIP ";   postProcessing,"}
{REPLACE "; layer 2," "G91 \nG1 Z10 \nG90 \nG1 X0 Y0 \nM0 Click To Restart \nG91 \nG1Z-10 \nG90 \n; layer 2,"}

Some really important things to note:

  • The fist line that says ‘STRIP’ is super important:  If you don’t do this, Simplify3D will embed a copy of the REPLACE line in the header of the gcode, but won’t properly comment it out, basically ruining the gcode.
  • In the STRIP line, there needs to be exactly three spaces between the semicolon ‘;’ and the ‘postProcessing text.  Any more or less will screw up the strip.  If you copy-paste this code, make sure there are three spaces in there.
  • As you can see, you need to insert newline characters (\n) into the string you’re building for it to show up properly in the gcode later.

Other notes:

  • Handy-dandy gcode reference.
  • If you don’t enter in some text after the M0, it’ll never un-pause (at least for me).
  • I got most of the code on my own, but was able to finish it off based on the help from this thread.
  • My printer starts off in absolute mode by default:  I know this because up at the top of the gcode, I can see a G90 command.
  • The S3D forum post here (under “Additional Terminal Commands For Post Processing”) list other post-processing commands you can use.

Building the C-Bot 3D printer: Part 28 : Lighting, Ringing, Breaking

Jump to C-Bot blog index to see all the posts.


This update is a combo post on several subjects at once:

Adding Lighting

Up until now, the C-Bot has been a dark printer:  No internal lighting whatsoever.  My Replicator1 is like a little supernova next to it when the room is dark.  But no longer:  Over the weekend I added both an 12v LED strip to the top-front X-beam (pointing directly at the print-bed) and a superbright LED directly on the print-head itself:

While my buddy Mason did a slick job of wiring his LED strip directly into the Rumba board on his C-Bot, so he can adjust the lighting based on the print settings, I did not:  I ran a extra 12v lead out of my power-supply, and connected both the LED Strip, and the superbright LED (with inline resistor) directly to it:  Turn C-Bot on, lights turn on.  Nuff’said / good enough.

Breaking

After I installed the lighting and turned the bot back on, the Bowden extruder suddenly started jittering:  It would no longer extrude filament.

I started by swapping a DRV8825 stepper driver from the z-steppers to the extruder stepper slot:  Try extruding, and it works.  Ok, it must be a bad DRV8825, and I have no spares.  But I do have a bunch of extra A4988‘s:  I’ll just put one in there, and updated my firmware to use it instead.  It doesn’t work:  Jittering starts again.  So I revert the firmware change, and put a ‘good’ DRV8825 back in:  Jittering.  What is going on?

Soon, any DRV8825 I put in that slot causes jittering, but they all work when plugged back into their original slot.  Drivers are good,… is my board bad?  At this point I disconnect the 4-prong JST connector running from the board to the stepper, and notice that one side is slightly melted: I remove the wires from the connector, and connect them on-by-one to the pins on the board:  Everything starts working again.

Canibalizing a connector from some other wires, I reinsert the leads, plug it into the board, and back in action.

Seriously?!?

Improving Ringing / Ghosting

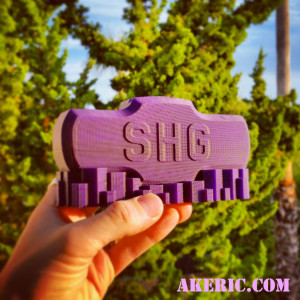
I had recently printed out a “Sledgehammer Games Recognition Coin Holder” for someone at work (I modeled it in Maya / Tinkercad):  We can give out cool coins to fellow employees for doing good work, and I designed this coin holder so people can show them off (there’s four slots in the top to hold the coins).

I’d printed many on my Replicator 1 in the past, and printed this one on the C-Bot for the first time.  And what I noticed was, there was a terrible amount of ghosting / ringing happening:

shg_recognition

Click to see the full-size that really shows the problem off.

This was printed with the .6mm E3D-Volcano nozzle, 300 micron layer heights at 60mm/sec, in MakerGeeks Royal Purple PLA.

The issue was, the prints done on my Replicator 1 had less ringing than the C-Bot, and this didn’t make sense to me:  The C-Bot has a Bowden extruder, thus removing a bunch of moving mass from the toolhead, not to mention it uses Core-XY mechanics, that is supposed to help out as well.  Why are things worse?

Posting this question to the 3D Printing Google Group, I got a bunch of good answers.  Specifically, my firmware acceleration may be too high, and the size of the printer itself could be causing too much shake, do to the lack of additional cross-members for stability.  Right now I have no surplus extrusions to stiffen it up, and my ultimate goal is to bolt the printer directly to the wall, thus really locking down any shaking.  But in the meantime, I can adjust the acceleration in the firmware.

I made a ringing/ghosting test model in Maya that would show off the issue on X, Y, and XY all at the same time.  I printed it with my default settings (3000 mm/sec), then dropped it waaay down to 800 mm/sec.  The results were pretty obvious:

ringing_comparison

Click for bigger pic

On the left of each image, is the ‘800 mm/sec acceleration’ print, and on the right is the ‘3000 mm/sec acceleration’ print.  These changes were made in Marlin’s Configuration.h:

#define DEFAULT_ACCELERATION 800
#define DEFAULT_RETRACT_ACCELERATION 800
#define DEFAULT_TRAVEL_ACCELERATION 800

I just set everything that looked applicable to 800.

So, an noticeable improvement.  But once I get the printer “bolted down”, I hope to be able to print even faster, with better results.


Jump to C-Bot blog index to see all the posts.

C-Bot 3D Printer: Resource Page

Jump to C-Bot blog index to see all the posts.


This page is a collection of resource for building my Core-XY C-Bot printer:  Electronics, hardware, software related.

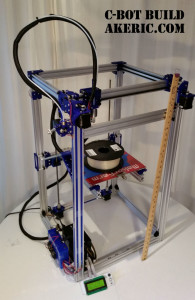
Finished C-Bot!

Finished C-Bot!

OpenBuilds Links:

  • Main C-Bot page : Includes printed part picture links, and external 3d files that are needed (for the Bowden extruder, etc).
  • C-Bot Forum : Fantastic Resource
  • C-Bot File List : Original BOM, assembly guide, and all the stl’s to print.
  • Link to my BOM.  This is a modified version from the OpenBuilds page based on my specific needs.
    • Note when ordering the hardware:  Think about the overall color of the printer:  Many nuts and bolts can come in silver or black:  Do you care? Should they all be one or the other?  Worth considering.

Hardware:

Core-XY Mechanics Theory Link

To build the 12″ x12″ x24″ build volume, these were my extrusions lengths:

  • The below labeling corresponds with the Assembly Guide updates (above link) that Mason Sheffield made.
  • 20×40 OpenBuilds V-Slot Extrusions:
    • A : Vertical Legs : 4x 820mm
    • B : Top/Bottom Horizontal X : x4 440mm
    • C : Top Horizontal Y : 2x 450mm
    • D : Base Horizontal Y : 2x 420mm
    • E : Print Bed Supports (Mounts to G) : 2x 395mm
    • F : Top XY-Gantry (what extruder mounts to) : x1 464mm
  • 20×60 OpenBuilds V-Slot Extrusions:
    • G : Rear Z-Slider : x1 428mm
  • ACME Leadscrews : 2x 705mm

Important notes though:

  • Using the E3D Volcano Extruder subtracts 2″ from your build height based on how much it hangs down.  And, the above calculates on the Z-axis were still off, so right now I’m at a practical 21″ build height not 24″.  To resolve a few options:
    • Cut longer A lengths.
    • Redesign the extruder holder to move it ‘up’ more.
    • Since my z-gantry is a 40×60, I could actually move the whole build-platform down by 20mm by sort of ‘reversing’ it.  however, I feel that design would give less overall strength to it.
  • Basically, calculate your extruder length into your overall height.

Electronics


Software/Firmware


Jump to C-Bot blog index to see all the posts.

Building the C-Bot 3D printer: Part 23 : Filament Cooling Fans

Jump to C-Bot blog index to see all the posts.


(Note:  Since I posted this, I upgraded the fans to more powerful models.  See that here.)

Total time:  About 2 hours.

Based on previously printed calibration cubes, I knew I couldn’t do any serious printing until I got my filament coolers installed:  I printed out the pair of them, bolted some 12v 40mm fans to them, ran the wires, and quickly realized I didn’t know how to tell Marlin & the Rumba board they existed.

Long story short, this is how I wired all the fans on the board:

  • The extruder cooler fan is plugged into the Rumba’s ‘Extruder2’ / pin 6 (I hijacked it, since I don’t have multiple extruders).
  • The filament cooler fans (one on each side of the hot-end, that this post is about) are plugged into the Rumba’s ‘Fan0’ / pin 7.
  • The two case fans (that cool the stepper drivers) are plugged into the Rumba’s ‘Fan1’ / pin 8.

Then in Marlin:

Configuration_adv.h : 
#define CONTROLLERFAN_PIN 8 // Rumba Fan1:  Case stepper driver cooling fan
#define EXTRUDER_0_AUTO_FAN_PIN 6 // Rumba Extruder2 : Extruder cooling fan

pins_RUMBA.h:
#define FAN_PIN 7 // Rumba Fan0 : Filament cooling fan
Once that was uploaded, the filament coolers got to work immediately:
filamentCooler2
My only concern is they don’t feel like they have enough ‘oomph’:  They’re 12v, .1A, if I buy any more in the future I think I’ll look for something with a higher CFM rating.  But for the time being, they work!  And as you see, some real printing is starting to happen…

Jump to C-Bot blog index to see all the posts.

Building the C-Bot 3D printer: Part 21 : Software Day 4: PID Autotune & start/end G-Code

Jump to C-Bot blog index to see all the posts.


Total time : 2.5 hours

Even though I need to really un-spaghetti the machine and do the final wiring, I can’t help but want to print more, especially since I installed & tuned the DRV8825 stepper drivers:  I want to make sure they actually work!

Start & End G-Code

At the same time, I wanted to create better start & end G-Code for the bot:  I slice & print using Simplify 3D (S3D):  When you create a new custom printer profile, for the start G-Code, all it does is a G28:  Auto-home.  It seems to take care of the extruder and bed heating for you.

In addition, even though I’d previously figured out how in S3D you can set ‘global G-Code offsets’ in its G-Code tab, which lets you define the offset between home and the build platform, I thought it’d be better to set it in the start G-Code instead. I don’t know why, but it feels safer in there…

I’ve never done any start\end G-Code ‘programming’ before. The start/end G-Code for my Replicator1 was already setup.  So heading off to the ‘G-Code in Marlin‘ page, I researched what I wanted it to do on start:

  • Lower the bed a bit just in-case it hadn’t before
  • Home all axes
  • Warm up the extruder (and eventually heated bed)
  • Purge the nozzle
  • Move nozzle to edge of the bed and zero it (per the above paragraph).
  • Start print

And on end:

  • Turn off extruder and bed heating
  • Lower the z-platform slightly
  • Home XY
  • Disable motors

Another great resource is S3D itself:  Once you’ve connected to your machine, and are in the Machine Control Panel, any commands you issue show up in the Communication log:  So I set about doing each step manually, then creating the G-Code script for them.

What I came up with is currently below.  I’m sure this will change in the future.  But just in case my computer explodes I’ll have a backup here.  Note that [stuff in brackets] is S3D’s own internal syntax for embedding variables to help make the gcode more temperature agnostic.  Pretty nice.

Start G-Code:

G92 Z0 ; Set current z position to zero.
G1 Z20 ; Lower Z to be safe 20mm.
G28 ; Safe Homing of All Axes
M104 [extruder0_temperature] T0 ; Set extruder targe temp
M109 S[extruder0_temperature] T0 ; Wait for extruder current temp to reach target temp.
G1 E50.0 F600 ; Purge nozzle 50mm at 10mm/sec
G92 E0 ; zero extruder
G1 X2 Y26 ; Move nozzle to left front corner of build platform.
G92 X0 Y0 ; Zero X & Y here to start the build.

End G-Code:

M104 S0 ; turn off extruder
M140 S0 ; turn off bed
G92 Z0 ; Set current z position to zero.
G1 Z10 ; Lower Z to be safe 10mm.
G28 X0 Y0 ; Home XY
M84 ; disable motors

So I fired off my first print over USB, and ran into all sorts of weird problems over the next hour.  Long story short:

Gotchas:

  • Every time I change a setting in S3D and want to re-print, I need to turn my printer off and on.  I don’t know if this is a S3D bug, a Rumba bug, a Marlin bug, or what.  But if I don’t do this, the start G-Code won’t properly execute.  Side effects include it not heating and immediately starting a print, or heating up but then never beginning the print after it.
  • Once that was resolved, for the longest time I couldn’t get the filament to stick to the bed:  it would just curl up around the extruder.  I finally realized that a new profile I’d setup had my layer height set to 200 micron… printing with a 1mm wide Volcano nozzle:  Once I set that back to 500 micron the printing had no problems.
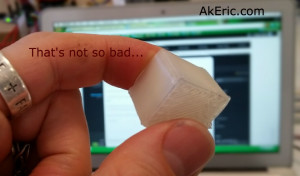
  • I really need to get a print-cooler fan installed:  I built a custom one for my Replicator 1 which has really helped.  When I finally got my printing working, and was working on a 2cm test cube, the sides looked pretty good for effectively my second print:
    • not too bad
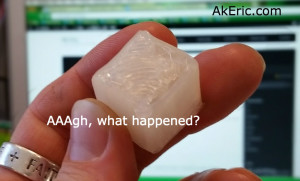
  • But when it got to the top, the whole print was so hot that the extruded top layer filaments literally started grabbing & collapsing the side-walls.  Plus when I went to remove it when the print was done, it was soft like warm gummy bear:
    • aaaugh
  • Top priority: Get print cooler fan installed.  Or maybe a jet of liquid nitrogen…. :)

PID Autotune:


Update:  Since authoring this post I have switched my electronics to RADDS, and my firmware to Repetier.  See the “Part 31 post” for the latest on it.


While my extruder has been heating up fine, I noticed that as it approaches the target temp (say, 200c) it really slows down for the last few degrees, and takes a long time getting to the final temp.  I remember that when I switched my Replicator 2x to Sailfish firmware, the extruders stopped heating up correctly, and talking on the forums they told me I needed to update my PID settings.

PID stands for “proportional-integral-derivative“, something I did not learn about in math class.  But in a nutshell it’s a way via the maths to reach a target value smoothly and quickly, without banging/oscillating all over the place.  And luckily, Marlin comes with a PID autotune feature you can run as G-Code directly from S3D (or any software that can issue G-Code):

M303 E0 S200 C8

Fire that off when you extruder is cold, and a few minutes later it’ll spit out something that looks like this:

Recv:  bias: 213 d: 41 min: 199.38 max: 200.71
Recv:  Ku: 77.96 Tu: 13.40
Recv:  Classic PID
Recv:  Kp: 46.77
Recv:  Ki: 6.98
Recv:  Kd: 78.32
Recv: PID Autotune finished! Put the last Kp, Ki and Kd constants from above into Configuration.h

And those values you then enter back into Marlin’s Configuration.h file.

These were my original values when I authored this blog post:

#define DEFAULT_Kp 46.15
#define DEFAULT_Ki 5.10
#define DEFAULT_Kd 104.32

UPDATE (2016-01-13) :  But I found when my powerful 24cmf cooling fan would kick on to cool the Volcano nozzle, the temp would drop, and it would take a loooong time trying to catch back up.  So instead, I cranked my fan to 100% (255) and re-running the auto-pid gave me the values in the code snatch two paragraphs up.

I never timed the nozzle warmup before, my E3d-V6 Volcano now heats up from cold to 200c in 2min 10 seconds:  Not too bad.

I’ve still not got my heated bed soldered up yet (waiting on 10-gauge wire in the mail), but I’ll run this again on the bed when it’s ready.


Jump to C-Bot blog index to see all the posts.