Posts Tagged ‘ map

New Commission: Denali

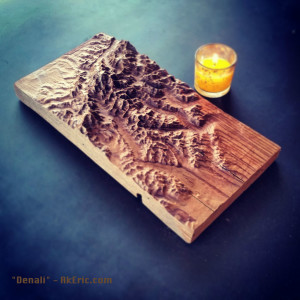
denali02_webWas recently commissioned to make another Denali cut on my X-Carve.  This time I swapped out the 1/4″ ballnose used for the rough cut for a 1/8″ ballnose on the finish cut:  Really helped the mountain detail pop.

I had split the rough and finish cuts into two files:  Only downside was that using Chilipeppr, it started to choke on the 4.8meg finish pass file. It would cut for 8 seconds, then pause for 4, etc, repeat… making it take waaay longer than it should (3.5 hour finish pass). Talking on the GoogleGroup, I guess this is a known problem, and the SPJS grbl code needs a port from tinyG. Next time I’m going to give UGS a shot…

I’ll give another shoutout to Terrain2STL, the great app I used to generate the terrain data.

New cut: “Denali”

New 3D Print: Oahu 2.0

I was recently commissioned to re-3d-print my Oahu design from a year and a half ago.  Since then I’ve built a bigger printer (the C-Bot), the terrain2stl software has been improved, I’ve gotten better at painting maps, and I built an X-Carve CNC.  I’m quite pleased with the end results:

oahu_final_sm

Stats:

  • 3D printed in Makergeeks ‘Nuclear Green’ and ‘Soulful Blue’ PLA.  I paused the print and swapped filament to change from water to land.
  • From tip to tip, the 3d printed part is close to 14″ across.
  • Sliced in Simpilfy3D:  At 200 micron and 90mm\sec with a .4mm nozzle, it took around 7 hours to print.
  • Modeling for both the map and the blue acrylic was done in Autodesk Maya.
  • Terrain was captured via terrain2stl.
  • The blue acrylic was cut on my X-Carve CNC, toolpath generated by Easel, took maybe 10 minutes.
  • After print, I sponged on dark green spray-paint, and after drying, light brown on the mountain tops.
  • The models height is scaled up 2x to exaggerate the terrain.

Another angle:

oahu_perspective_sm

And the raw print:

oahu_unpainted_sm

If this is something you’d like in your home (or any other map) let me know and we can work something out.

New 3D Print: Maui

I’ve 3d printed a few other maps, and got a lot of enjoyment out of it:

I recently spent a week in Maui:  This gave me inspiration to do a (painted) 3d print of it on my C-Bot:

maui_painted_main

The below post is an overview of how I designed, printed, and painted it.


Getting the Mesh Data

I first headed to the web app Terrain2STL : This is the great little program that lets you download 3d-printable terrain data.

However, no matter what you set the capture-box size to, it captures the same resolution of data.  If you make the box the size of the whole island of Maui, you end up with a pretty low-resolution capture mesh, based on the detail I want to 3d print.  So the only way to get a ‘high-res’ Maui mesh is to download many small chunks, that will later be seamed together to build a high-res island.

In Terrain2STL, I set the box size (ARC seconds) to 360.  Based on that size, I can adjust the latitude & longitude values by .1 values, to offset the box by one length in either direction.  So stating at the NW corner of Maui, I started capturing squares of it’s mesh.  In total, I made 30 captures.

Assembling the Mesh Data

In Autodesk Maya, I created a new scene, and started importing in each STL that Terrain2STL generated.  Starting in the NW corner, I’d import in the next stl, line it up with the last, and repeat that process.  Which gave me something that looked like this upon completion:

maui_maya_chunks_raw

I then went through the process of deleting all the mesh that wasn’t part of the island, stretching all the edges down to make a cliff-like effect, making a base for it, and creating the text.  I also did a lot of mesh cleanup since the Terrain2STL tool isn’t perfect.  Final Maya result:

maui_maya_final

tried to boolean all the mesh together, but Maya just wouldn’t do it.  This left me frustrated, but I realized that Simplify3D (the slicer I use) allows you to import in multiple mesh:  In Maya, I made sure the pivots of all the mesh were at the origin (so they’d all show up in Simplify3D in the correct location), the transformations frozen, and I exported every individual piece as a new STL.

Slicing The Data

I imported all the stl’s into Simplify3D:  They appeared to all line up correctly.  I wanted the island to be scaled 2x on the Z axis, so I grouped all that mesh, and applied the scale transformation.

But when I sliced it, I noticed lots of little gaps between the mesh chunks:

maui_sliced

Come to find out, even though all the mesh was lined up correctly, in some cases… it just wasn’t enough for Simplify3D : This spawned a painful process of me moving pieces, re-slicing, checking gaps, etc.  But eventually I got rid of them all.  The general prints stats were:

  • 200 micron, .4mm E3D-v6 Volcano nozzle
  • Maker Geeks Gray’matter Gray PLA @ @210 deg.  Bed @ 50 deg.
  • 90 mm\sec print speed.
  • 2 shells, 4 roof\floor. 10% ‘fast hexagonal’ infill.

Took around 13 hours to complete.  Based on my 12″x12″ build platform, printed diagonally it came out to 14″ across:

maui_noPaint

Painting the model

I wanted to try a new (for me) dry-brush technique to show off the mountains.

To start, I shot the whole model in a pleasing Rust-Oleum ‘Meadow Green’ color:

maui_midPaint

After that dried, I sprayed “Maui Blue” (can’t believe I found a color that matches the medium I’m painting) onto a foam brush, and painted up the ocean.  Finally, I sprayed a light-brown onto a paper towel, and then brushed it across the mountain peaks for the final result.
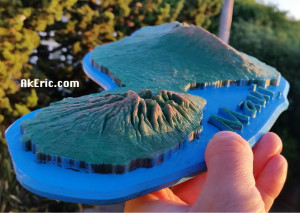
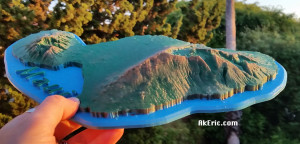
maui_painted_NW maui_painted_SW

Was really pleased with the results!

Howto: Pause Marlin for filament reload at a specific layer number

I’ve had fun in the past printing maps with water (SF Bay, Oahu) : Using my Replicator 1 & it’s Sailfish firmware, it was easy via the LCD to set a specific layer number to pause at:  Doing this, I’d calculate which layer the print transitioned from water to land, pause it there, and swap filament.

Marlin firmware (which is on my C-Bot) gives you no such feature via the LCD :  Which means you have to monitor the print, and when it appears land is printing, you quickly pause the bot, go through the manual steps (via the LCD) to lower the bed, possibly move the hotend out the the way, and do the reload.  Afterwards (via the LCD) you have to get everything back into position. Awkward.  I am aware that the latest cut of Marlin allows for filament reload via the LCD:  I’ve been unable to get it to work.  And even if it did work, it’s still not accurate enough since I’m guessing at the layer to pause at.  There must be a better way!

There is:  You can directly edit the .gcode to insert a chunk that will do exactly what you need:  Lets say you want to pause just before layer 2 starts:  You’d find the line starting with the layer change comment…

; Layer 2

in your .gcode file, and then paste this right above it (I’ve included the layer change comment in the below code, plus comments for what the commands are doing):

G91                  ; Put in relative mode
G1 Z10               ; Lower bed by 10mm
G90                  ; Put back in absolute mode
G1 X0 Y0             ; Zero (home) the X & Y
M0 Click To Restart  ; Pause and wait for the user
G91                  ; Put in relative mode
G1 Z-10              ; Raise the bed back up 10mm
G90                  ; Put back in absolute mode
; layer 2, Z = 0.45

Works like a charm :)

If your slicing software supports post-processing of the gcode, it’s possible you can do this work directly in the slicer.  I slice using Simplify3D:  In a given process, it has a section in its ‘Scripts’ tab, at the bottom, called ‘Additional terminal commands for post processing’.  This allows you to enter in script to do a text-replace in your file, to edit it for you.  I learned about it on a forum post here.

To do the above using that system, you’d need to enter this text into that field:

{STRIP ";   postProcessing,"}
{REPLACE "; layer 2," "G91 \nG1 Z10 \nG90 \nG1 X0 Y0 \nM0 Click To Restart \nG91 \nG1Z-10 \nG90 \n; layer 2,"}

Some really important things to note:

  • The fist line that says ‘STRIP’ is super important:  If you don’t do this, Simplify3D will embed a copy of the REPLACE line in the header of the gcode, but won’t properly comment it out, basically ruining the gcode.
  • In the STRIP line, there needs to be exactly three spaces between the semicolon ‘;’ and the ‘postProcessing text.  Any more or less will screw up the strip.  If you copy-paste this code, make sure there are three spaces in there.
  • As you can see, you need to insert newline characters (\n) into the string you’re building for it to show up properly in the gcode later.

Other notes:

  • Handy-dandy gcode reference.
  • If you don’t enter in some text after the M0, it’ll never un-pause (at least for me).
  • I got most of the code on my own, but was able to finish it off based on the help from this thread.
  • My printer starts off in absolute mode by default:  I know this because up at the top of the gcode, I can see a G90 command.
  • The S3D forum post here (under “Additional Terminal Commands For Post Processing”) list other post-processing commands you can use.