Digital to wood : A new X-carve piece
New piece I made on the X-Carve: It measures just under 12″ square, by 1/3″ thick, birch plywood, with some ‘natural’ stain applied:
So how did I get there?
Years ago, like ’98-2000-ish, I was really into building shader networks in Maya. I loved their ramp shader, so versatile. Later Maya introduced their ‘layered shader’, which is a lot like a layered file in Photoshop. Over the years my career in CG has taken me away from shader creation, but I always remember how much fun it was ‘back in the day’.
Fast forward to now with the X-Carve : I know that I can turn a grayscale height-field into mesh, and MeshCAM will turn it into a toolpath, so this was my first attempt at doing just that, via a shader network in Maya:
This visualizes (from right to left) the shading group (which the mesh is assigned to) that has both a lambert (just for mesh visualization) and displacement material (for later conversion to displaced polys) assigned. They’re in turn both fed by a layered texture, that has inputs from a ramp (on top) that defines the border, an ocean texture (that makes the ripples), and another ramp that makes the circles. I authored a Python script that automates this whole creation process and mesh assignment, with a simple window so I can repeat this process easily. Iteration is king.
From there, I had something that looked like this, assigned to a flat, tessellated polygonal plane:
Which I then converted into displaced polygons (Maya: Modify -> Convert -> Displacement To Polygons)
Exported as an stl, and brought that into MeshCAM for toolpath generation as a two-part cut:
- Rough pass with a 1/4″ two-flute upcut endmill.
- 60 inch/min
- DOC .0625″
- Stepover .125″
- Finish pass with a 1/8″ two-flute upcut ballnose.
- 60 inch/min
- DOC .0312″
- Stepover .025″ : Should have doubled this to get rid of the scalloping.
- Had the DeWalt 611 router speed set to 1 on both based on rough chipload calculators: Seemed to do fine, occasionally had some stuttering on the rough pass.
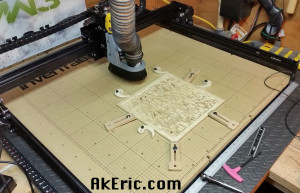
I sent the gcode to the X-Carve via Chilipeppr, and over the next 2.5 hours watched the magic ensue:
The above pic shows the final pass emerging from the rough.
Until the final product appeared:
All the hold-downs are overkill, but I realized I had told MesCAM to machine the entire stock, so I had to move them around as the progressed from bottom to top, or I would have machined the clamps themselves. Noob move.
Pretty happy with the end-result: It’s actually quite confusing to the eye in person as the shadows dance around it. Great test though, and a lot learned.


