Tuning jerk values in Repetier
(Note: Based on continual feedback I’ve been rewording sections, to hopefully make it clearer)
Now that I’ve switched my C-Bot over to new electronics (RADDS) and firmware (Repetier), it’s time to start getting serious about tuning: After running some initial test prints, I wasn’t satisfied with the ghosting/ringing that was occurring on the prints, so I decided to tweak the Repetier jerk settings, since I know they can have an impact.
The goal of this test: Really, to compare how jerk impacts print quality, and print speed (the value you set in our slicer) vs print time (how long the print actually takes). I’m not making any recommendations based on these results: You can make your own decisions based on the data presented below, and how that may impact your printer based on it’s mechanics & firmware.
I adjusted the jerk on the fly from the LCD, storing them back to EEPROM before each print. The default jerk values in Repetier are 20, and can also be set via the ‘Mechanics’ tab via the online configuration tool (requiring a re-flash of the firmware from the Arduino IDE). There is also a nice description of Jerk via the Repetier Firmware Installation Page. From that page though, the high-level important stuff:
You want high jerk values, because
- Printing time is reduced.
- Print shows less blobs.
You want low jerk values, because
- It causes less mechanical stress to your printer.
- Moves are smoother.
- Filament has better adhesion at directional changes.
- Reduces printer noise.
- You loose steps with higher values.
Other Hardware\Slicer Stats:
- Hardware is RADDS\Arduino Due (32-bit ARM). Stepper drivers are SD6128’s, at 1/32 microstepping, turned to .55v
- The C-Bot is core-xy kinematics.
- I sliced these in Simplify3D:
- 2 shells, 4 roof\floors, 10% ‘fast hexagonal’ infill.
- Outline underspeed at 75%: I didn’t realize this until after the test (since it’s sort of standard operating procedure for better quality), but in hindsight I wish I’d turned it off for this test.
- 200 micron layer heights.
- .4mm nozzle on an E3D-v6 Volcano.
- Print speed adjustment for cooling is disabled (no slowing down for small layers): I didn’t want the print times to be adjusted because of print cooling. However, the filament cooling fan is enabled (since I’m printing in PLA).
- Used MakerGeeks Gray’Matter Gray PLA, printed @ 210 deg (they recommended 230 on the spool, but it seemed unnecessary).
- In Repetier, my xy acceleration values are 1000 (default).
I printed two sets of three #3DBenchy models: I chose the benchy since it’s small, but complex. The first set was with a jerk of 10, the second with a jerk of 40. For each set of three, printed them with these speeds: 60/90/120 mm/sec. Below are a list of the times it took to print each.
Stopwatch was started when extrusion began, after nozzle & bed warmup. Stopwatch was stopped when print completed, and end gcode ran.
Print speed/time comparisons, sorted by jerk:
- JERK 10 | 60mm/sec:50min | 90mm/sec:43min | 120mm/sec:40min
- JERK 40 | 60mm/sec:50min | 90mm/sec:35min | 120mm/sec:30min
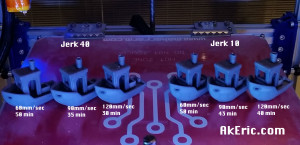 (click all images for bigger pics)
What does this tell us about speed/jerk tradeoffs?
Numeric comparison of print time:
Based on the above speeds (mm/sec) and print time (in min) from above.
Comparing JERK 10 to itself:
- 90mm/sec had a print time 1.16x faster than 60mm/sec, even though the speed was set 1.5x faster.
- 120mm/sec had a print time 1.075x faster than 90mm/sec, even though the speed was set 1.33x faster.
- 120mm/sec had a print time 1.25x faster than 60mm/sec, even though the speed was set 2x faster.
Comparing JERK 40 to itself
- 90mm/sec had a print time 1.43x faster than 60mm/sec, even though the speed was set 1.5x faster.
- 120mm/sec had a print time 1.17x faster than 90mm/sec, even though the speed was set 1.33x faster.
- 120mm/sec had a print time 1.66x faster than 60mm/sec, even though the speed was set 2x faster.
Comparing JERK 10 to JERK 40:
- 60mm/sec jerk 40 had the exact same print time as jerk 10.
- 90mm/sec jerk 40 had a print time 1.23x faster than jerk 10.
- 120mm/sec jerk 40 had a print time 1.33x faster than jerk 10.
Things observed from the numbers:
- There is not a linear relation in increasing the ‘speed‘ in mm/sec and reduction in print times (which I knew, but it’s nice to see real data back this up). Meaning, if 50mm/sec took 50 min to print, 100mm/sec won’t take 25min, it will be some value in-between (based on factors like jerk, acceleration).
- Interesting that 60mm/sec speed had the exact same print times for jerk 10 & 40 : Guess at that speed the jerk-clamping has a lower effect.
- There is definitely a point of diminishing returns on high print speed and low jerk. At a certain point the low jerk clamps the speed so much that it can never accelerate high enough to have an appreciable effect on print time (this is my theory at least).
- The larger (40) jerk value had the widest range in print time variance (30 min -> 50 min) since (I presume) the jerk wasn’t clamping down the speed so much.
Visual comparison of quality:
Comparing Jerk 10 to itself:
Across the board all speeds of jerk 10 did well quality-wise. Nearly no ringing at 60mm/sec, and minimal ringing on the 90 & 120mm/sec. The only really visual differences is the discoloration of the PLA as it was printed faster.
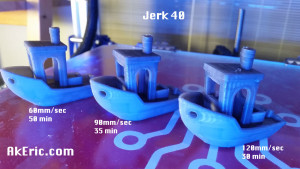
Comparing Jerk 40 to itself:
Ringing across all speeds. Passable at 60mm/sec, but I don’t like what I see at 90 & 120.
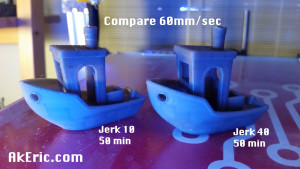
Compare 60mm/sec:
While both had the exact same print time, there is virtually no ringing on the jerk 10, while ringing is visible on the jerk 40. A strange random print artifact showed up on the smokestack of the jerk 10 that didn’t show up on any other prints. Ghost in the machine.
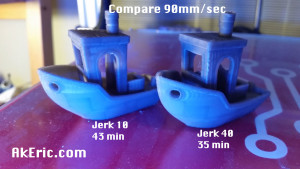
Compare 90mm/sec:
Very slight ringing on the jerk 10, ringing is quite apparent on the jerk 40.
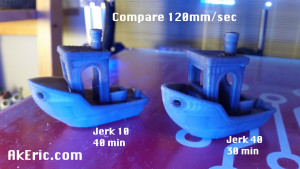
Compare 120mm/sec:
Ringing is just starting to show on the jerk 10, and jerk 40 looks like a train-wreck. Or a ship-wreck.
Final Thoughts, Opinions:
- The default jerk values in Repetier are 20, which is why I wanted to try two values on either side that would really show off the differences, since I was still getting rigging at 20 at 90mm/sec before this test.
- I think that you need to make a decision when starting the print: Quality vs speed? All depends on what you’re printing. If this is a structural part where the visual artifacts of ringing are tolerable, then crank up that jerk. But if it’s a artistic piece, then lower it down. What’s nice is that you can adjust this from the LCD in Repetier and set it in EEPROM per-print, not requiring any type of re-slicing.
- Maybe I’ll just set it back to 20. HA!

No comments yet.