Arduino 4wd robot & Ping))) sensor
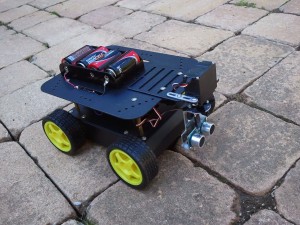
Armed with the knowledge of my previous “Ponar” post, I successfully completed construction and programming of my “Arduino-based 4wd robot with servo-actuated Ping))) sensor”. It was an enjoyable process with a lot of trial and error since: I’m still learning a lot about how the Arduino works, how hardware hooked up to it works, and electronics work in general. To get things started, here is a video of it driving around my kitchen:
Here’s the parts list:
- Arduino Duemilanove (I’m sure any modern Arduino board will work though)
- Adafruit Motorshield
- Paralax Ping))) sensor
- Paralax (Fubata) “standard servo” and mounting hardware
- DFRobot 4wd mobile platform
- Extra 4xC battery holder (6v).
- Extra toggle switch (the robot kit comes with one, I needed two).
Here’s the Arduino program:
How it works:
- I wanted a simple robot to drive around avoiding obstacles using the ping sensor. To do that, I sketched out (on paper) the general program, that went like this:
- Ping to see if there is any obstacles in front.
- If not, drive forward, while pinging.
- If there is an obstacle, stop, and take a distance reading to the left and right of the robot.
- Turn for a fixed period of time in the further direction.
- Ping again: If still blocked, keep turning that direction. If not blocked, go back to drive mode.
- There are basically three modes the robot can live in: Drive forward (mode 1), stop and scan (mode 2), and turn (mode 3). When driving, it can do three things: Drive straight, turn left, turn right.
- The hardware is configured like so:
- The Adafruit Motorshield is plugged into the top of the Arduino.
- The Arduino is powered off of 5xAA batteries (7.5v) in the belly of the robot. These are wired to a switch sticking out the back of the robot.
- The Motorshiled is powered off a separate 4xC battery pack (6v) on top of the robot. These are wired to another switch on the back of the robot.
- The 4 DC wheel motors & servo are powered off the Motorshield.
- The Ping))) sensor draws power form the Arduino.
Things Learned:
- Next time, use 2-wheeled robot instead: easier to steer around the house. The “tank steering” method of this robot seems like it uses a lot of power and doesn’t work very good.
- I read it in a couple places, and it turns out it’s probably needed: Solder a 1uf capacitor between the leads on the DC motors to help “smooth out” their operation. Otherwise it seems little “hiccups” can happen while driving.
- Voltage, voltage, voltage:
- I was having all sorts of problems getting the motors to work properly: They’d start\stop “hiccuping” a lot. Per the above note I added in extra capacitors on the motors themselves, but it didn’t solve all the problems:
- Originally I had the motors hooked up to the 5xAA battery pack (7.5v) that came with the robot chassis. The motors per the specs are rated at max for 6v. But… I didn’t know this. I thought it needed moar power. So I went out and got a 6xC (9v) pack and powered the motors through that. The stuttering got even worse (although, it went pretty fast when it behaved) and even did something really stupid: Put one of the batteries in backwards… which caused it to melt-down and leak acid everywhere. Sigh…
- Finally (after I knew the correct voltage for the motors and servo) I went out and got a 4xC pack (6v), and that, combined with the extra capacitors, finally gave it a smooth ride.
- I had to solder in extra connections to the analog pins on the motorshield to allow fo the Ping))) sensor to passthrough it to the Arduino (acting as a digital pin). However, the motorshield has the pins in the order of “signal\-\+”, while the cables from the Ping))) (and servo) are “signal\+\-“. Not sure why the motorshield would break ordering convention, but I had to splice and re-wire the Ping))) cable to match the board.
- The motorshield docs say that servo2 is pin9, but it’s actually pin10. That took me a while to figure out… :-S
- I ran into a lot of problems with the programming of the robot itself:
- The behavior is to run, ping, scan, repeat. But during “scan” it wouldn’t drive the servo full left\right: Sometimes it would only got left, never make it right.
- To solve this, I put a “timer” in the code, that would only execute the main loop if a certain amount of time in ms had passed (30ms to be exact, which makes it run around 30fps in game terms). This seemed to make it behave exactly how I wanted.
- I thought I needed to tell the motors to run on every loop: It turns out they’re a state machine: once you tell them to run, they keep running until you tell them otherwise. Knowing this helped me clean up the code.
- There doesn’t seem to be any official documentation I could find to the motorshield library, I had to crack open this header file to deduce what it could do: AFMotor.h
Picture time! Click to enlarge:
And a final shot of the wiring on the board per request:
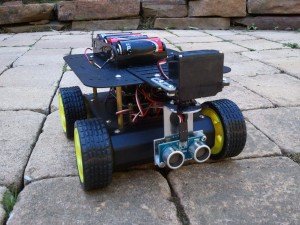
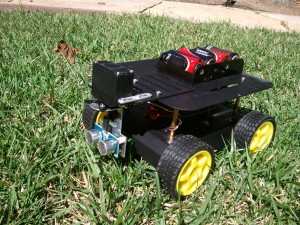
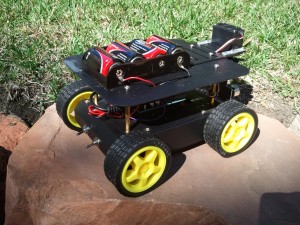
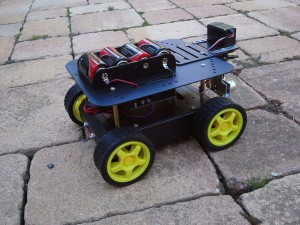

Hi
great project and thank you for sharing you code and project.
I am in the process of building a simalar car and want to use the ultrasonic
device i have in my box.
The problem is it is a four pin standard unit with trigg and echo on differebt pins
Would it be possible to alter code to use this device rather than the 3 pin device in your project
many thanks
Peter
I don’t see why it wouldn’t be: As long as your sensor is the right voltage for the logic level of your arduino, and you understand what the pins do. May require changing the code, but I’d check to see if your sensor’s manufacturer has example code for running it.
Thanks for taking the time to reply
Regards
Peter
Hi Eric,
This is very useful. At this moment I’m building my own vehicle.
Do you maybe have a schematic image or photos where you can see how to connect the wires?
Thanks!
i’ve updated the post with a pic of the wiring of the board.
Hi Eric
have solve the problem with the sensor just had to join the trigger and echo pins together and it works fine.
Your code and comments are just perfect. my car is working and I am trying to fit edge sensors and making alterations to code to see if I can get it to work
Thanks again for posting your project.
regards
Peter
P.S. Have you a link so I can post you a photo of my project
@Peter England
If you email me a warpcat at gmail dot com I can add your pics as a ‘guest build’ section on the blog
Fantastic WORK !!!
Hi Eric,
I have uploaded your code (Thanks a lot for sharing). By the way I have an issue this is the message I get when compiling :
C:\Users\Skyangels\Desktop\Robot Waia\Waia_autonome_V1_1\Waia_autonome_V1_1.ino: In function ‘void loop()’:
Waia_autonome_V1_1:65: error: ‘ping’ was not declared in this scope
g_cm = ping();
^
Waia_autonome_V1_1:71: error: ‘move’ was not declared in this scope
move(g_driveDir);
^
Waia_autonome_V1_1:78: error: ‘move’ was not declared in this scope
move(g_driveDir);
^
Waia_autonome_V1_1:93: error: ‘proximityCheck’ was not declared in this scope
boolean checked = proximityCheck();
^
Waia_autonome_V1_1:113: error: ‘turn’ was not declared in this scope
turn();
^
exit status 1
‘ping’ was not declared in this scope
Do you have any ideas on how I can solve that ?
Best regards.
Romain
@Romain
I’m thinking you’re using different code than what I provided? ping (along with all the other errors) is a function in the sketch I provide, so you’ll need to make sure they’re part of your sketch to. Just guessin’ here.
I just want to ask what if we decided to stop at desired distance , just say we want to make it as a measuring tools, what should changed in the coding?
It’s been a long time since I’ve worked on that code. As is, it’s not going to track distance traveled, there’s no sensors on board to detect for that. You may be able to use a sensor to track the wheel spin, and then based on circumference\revolutions, trigger the behavior you’re after.