Archive for the ‘ CG ’ Category

adbWireless

Just ran across this great tool\app for Android development:  adbWireless.  It allows to you create a wireless (WiFi) adb (Android Debug Bridge) connection between your computer and your Android phone .  I can now present Processing sketches directly to the phone USB-free.  As mentioned\found in the comments below, you need root access for the app to function.  Worked on the first try, had to pass it along.

Android Adventures part 7.5 : More multi-touch in Processing

Back to part 7…, on to Part 8…

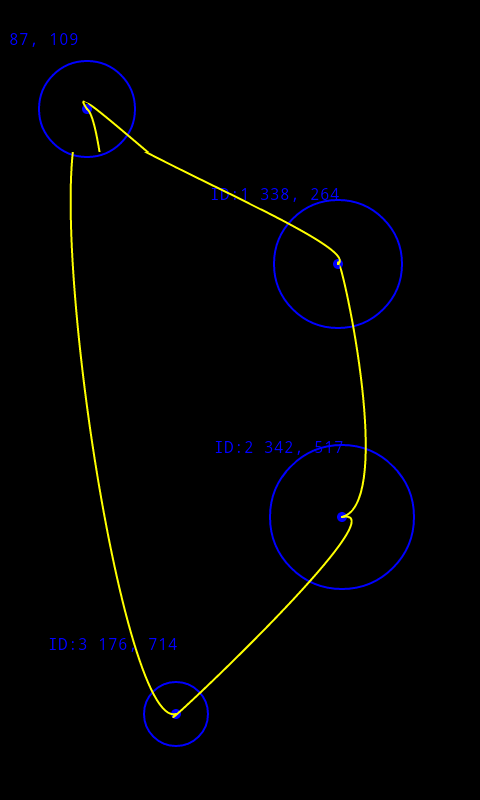
Example sketch made with this code.

Based on my previous post (part 7), I wanted to advance the capabilities of multitouch in Processing a bit more.  The previous example was fairly primitive, but got the job done.  However, it had a few shortcomings:

  • The drawing of graphics was happening in the surfaceTouchEvent() function, rather than Processing draw() function.  This caused a bit of flickering on screen, and made it hard to screengrab stuff from the Davlik Debug Monitor.
  • It only tracked the current position; it stored no historical data.  What if you wanted to track the previous frames position for a certain touch point to generate a motion vector?

With a bit of work I came up with the below code.  It is a snapshot of only the code that is needed to enable more robust multitouch querying in your Processing sketch.  You’d take over in the draw() function. Quick overview:

  • At the top two global variables are defined that store the max number of touch points your phone supports (by trial and error via this code I found that my phone has five), and an array that will store the MultiTouch data.  It should be noted that you can set maxTouchEvents to a higher number just to be safe, shouldn’t hurt anything.
  • setup() populates the MultiTouch array with new MultiTouch objects.  Each object tracks a different touch point.
  • draw() then checks for updated (touched) MultiTouch data, and then exposes those objects to you to query.  The attributes I gave them mirror how Processing deals with querying mouse positional data:  motionX, pmotionX, motionY, pmotionY, size, psize, id.
  • surfaceTouchEvent() is a function that can be overridden to intercept Androids MotionEvent objects, that store the MultiTouch data in them.  That’s what happens below:  It updates our MultiTouch array created earlier with any new MultiTouch data whenever the screen has motion applied to it.
  • MultiTouch is the class that stores the data extracted from the Android MotionEvent object.  One is created per touch point on screen (so if you have five touch points, then you have five of these objects).

Here’s the code:

// multiTouchCore.pde
// Eric Pavey - 2011-01-02
// Code used to get multitouch working in Processing.
// Add to what's in the draw() function to implement the magic.

// It's all about the MotionEvent:
// http://developer.android.com/reference/android/view/MotionEvent.html

//------------------------------
// Setup globals:

// Define max touch events.  My phone (seems to) support 5.
int maxTouchEvents = 5;
// This array will hold all of our queryable MultiTouch data:
MultiTouch[] mt;         

//------------------------------
void setup() {
  // Populate our MultiTouch array that will track all of our touch-points:
  mt = new MultiTouch[maxTouchEvents];
  for(int i=0; i < maxTouchEvents; i++) {
    mt[i] = new MultiTouch();
  }
}

//------------------------------
void draw() {
  // If the screen is touched, start querying for MultiTouch events:
  if (mousePressed == true) {
    // ...for each possible touch event...
    for(int i=0; i < maxTouchEvents; i++) {
      // If that event been touched...
      if(mt[i].touched == true) {
        // DO SOMETHING WITH IT HERE:
        // Amazing mult-touch graphics implemeneted....
      }
    }
  }
}  

//------------------------------
// Override parent class's surfaceTouchEvent() method to enable multi-touch.
// This is what grabs the Android multitouch data, and feeds our MultiTouch
// classes.  Only executes on touch change (movement across screen, or initial
// touch).

public boolean surfaceTouchEvent(MotionEvent me) {
  // Find number of touch points:
  int pointers = me.getPointerCount();
  // Set all MultiTouch data to "not touched":
  for(int i=0; i < maxTouchEvents; i++) {
    mt[i].touched = false;
  }
  //  Update MultiTouch that 'is touched':
  for(int i=0; i < maxTouchEvents; i++) {
    if(i < pointers) {
      mt[i].update(me, i);
    }
    // Update MultiTouch that 'isn't touched':
    else {
      mt[i].update();
    }
  }

  // If you want the variables for motionX/motionY, mouseX/mouseY etc.
  // to work properly, you'll need to call super.surfaceTouchEvent().
  return super.surfaceTouchEvent(me);
}

//------------------------------
// Class to store our multitouch data per touch event.

class MultiTouch {
  // Public attrs that can be queried for each touch point:
  float motionX, motionY;
  float pmotionX, pmotionY;
  float size, psize;
  int id;
  boolean touched = false;

  // Executed when this index has been touched:
  //void update(MotionEvent me, int index, int newId){
  void update(MotionEvent me, int index) {
    // me : The passed in MotionEvent being queried
    // index : the index of the item being queried
    // newId : The id of the pressed item.

    // Tried querying these via' the 'historical' methods,
    // but couldn't get consistent results.
    pmotionX = motionX;
    pmotionY = motionY;
    psize = size; 

    motionX = me.getX(index);
    motionY = me.getY(index);
    size = me.getSize(index);

    id = me.getPointerId(index);
    touched = true;
  }

  // Executed if this index hasn't been touched:
  void update() {
    pmotionX = motionX;
    pmotionY = motionY;
    psize = size;
    touched = false;
  }
}

Back to part 7…, on to Part 8…

Android Adventures, part 7: Multi-touch in Processing

Go to part 6…, part 7.5…
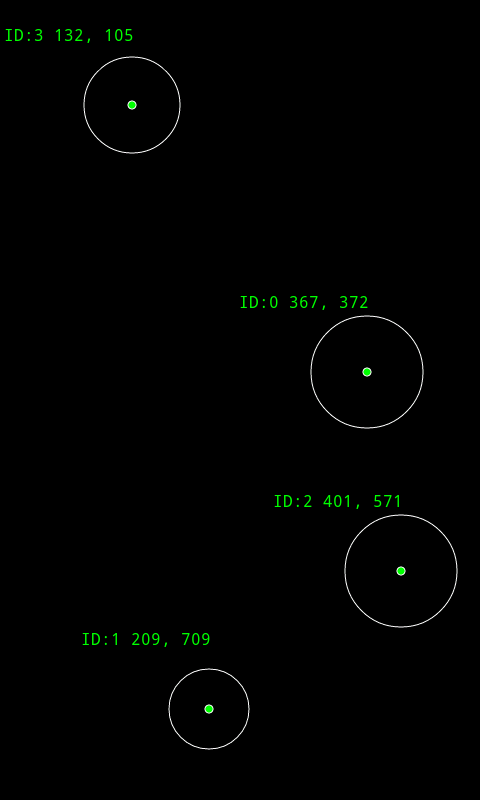
Screenshot from my Samsung Captivate

One of the main reasons I got the phone was do to multi-touch apps.  The Processing for Android wiki points to some work done here to make this implementation easier.  But its a straight Android\Java implementation, and I really didn’t feel like trying to hack that into Processing.  Maybe it’s easy, but not for my brain a few days after Christmas.

I thought I’d see what it would take to code this from scratch, and it was surprisingly easy, at least for my needs.  All I wanted was a way to track multiple touch-points on screen.  The below code does that, plus tracks their ID’s, and their ‘size’.

Code Update: Previously I was pulling this info from the Android MotionEvent class that is returned by the sketche’s parental Activity class dispatchTouchEvent method.  However, this disabled Processings own motionX\motionY, mouseX\mouseY variables from ever getting populated.  Looking at the ‘Android – Processing’ wiki (here) it describes how you can can override Processings own surfaceTouchEvent function, which also accepts a MotionEvent as a argument.  This works the exact same as my original code, but no longer blocks the population of Procesisng variables.  So find updates in the source below.

surfaceTouchEvent is only triggered by pressure or motion change on the screen.  So it won’t execute if you’re not touching the screen, or if your finger is touching the screen, but stopped moving.  It is however, a good start 😉

The below Processing sketch will draw a circle under each touch point, along with the id, x, & y positions, and scale the circle based on the touch pressure.

// Eric Pavey - AkEric.com - 2010-12-29
// Example showing simple multi-touch detection in 'Processing - Android'.
// My Samsung Captivate (Galaxy S) can track 5 touch-points.
// Updated to work with Processing's surfaceTouchEvent instead of
// Android's dispatchTouchEvent.

// Should point out that API Level 9 has MotionEvent.PointerCoords class that
// expose some cool functionality, but I'm only on Level 7.

String[] fontList;
PFont androidFont;
int circleBaseSize = 512; // change this to make the touche circles bigger\smaller.

void setup() {
  size(screenWidth, screenHeight, A2D);
  // Fix the orientation so the sketch won't reset when rotated.
  orientation(PORTRAIT);
  stroke(255);
  smooth();
  // Setup Fonts:
  fontList = PFont.list();
  androidFont = createFont(fontList[0], 16, true);
  textFont(androidFont);
  textAlign(LEFT);
}

void draw() {
  background(0);
}

void infoCircle(float x, float y, float siz, int id) {
  // What is drawn on sceen when touched.
  float diameter = circleBaseSize * siz;
  noFill();
  ellipse(x, y, diameter, diameter);
  fill(0,255,0);
  ellipse(x, y, 8, 8);
  text( ("ID:"+ id + " " + int(x) + ", " + int(y) ), x-128, y-64);
}

//-----------------------------------------------------------------------------------------
// Override Processing's surfaceTouchEvent, which will intercept all
// screen touch events.  This code only runs when the screen is touched.

public boolean surfaceTouchEvent(MotionEvent me) {
  // Number of places on the screen being touched:
  int numPointers = me.getPointerCount();
  for(int i=0; i < numPointers; i++) {
    int pointerId = me.getPointerId(i);
    float x = me.getX(i);
    float y = me.getY(i);
    float siz = me.getSize(i);
    infoCircle(x, y, siz, pointerId);
  }
  // If you want the variables for motionX/motionY, mouseX/mouseY etc.
  // to work properly, you'll need to call super.surfaceTouchEvent().
  return super.surfaceTouchEvent(me);
}

Go to part 6…, part 7.5…
New Android App: Floater

Find more info and install instructions from it’s page.

Floater is a particle sim responding to touch that runs on Android devices.   I built this app on an Win XP box, via Processing, specifically the “Android – Processing”.  It was tested on a (rooted) Samsung Captivate (Galaxy S), running Android 2.1.

If you get it running on a different piece of hardware, I’d really like to know :)

Merry Christmas!

Android Adventures, part 6: Building a signed .apk from Processing

Go to part 5…, part 7…

Processing makes it really easy to “Present” a sketch to your Android phone via it’s “Present” button.  This creates a special ‘debug’ apk that can run on your specific device, but isn’t distributable (and I can’t even find it on the phone) to others.    There is no easy way (yet) to get these sketches to other users via the apk format.  But thanks to the great user community (and one specific post in question) I was able to get a signed apk built and installed on my phone.  Follow-up post will expose this apk to the world 😉

How to do it?

First Export the sketch.  Then Sign the Sketch.  Sounds easy.  The first part is… 😉  Below is the process I took to get my “floater08″ sketch “apk’ed”, so it’s what I’ll use as an example:

Part 1:  Export the sketch

  • From the Processing PDE, open the sketch (go into ‘Android -> Android Mode’), and press the “Export” button (arrow facing to right).  This will export the android data and put it in an \export folder under the sketch:
  • C:\sketchbook\floater08\android

That’s the easy part.

Part 2:  Signing the sketch

Docs:

The Android-Processing wiki (under the ‘Distributing Apps’ section) links to these Android Docs for signing an APK.  But I followed the steps on this incredibly helpful post (the ones by user ‘ckamath‘ specifically) to get me going.  Below is an overview of my process working with this information.

Install Tools:

Like the post says, make sure you can run these commands from a shell: keytool, jarsigner, zipalign, ant.  I didn’t have ant, so I installed it from here, following these steps (specifically everything it says to do under “The Short Story” & “Setup”).  jarsigner and keytool are provided via the JDK which I’d already installed.

Like the post says, I also (apparently) needed cygwin which provides OpenSSL.  After downloading and running the setup.exe cygwin installer, I figured out I needed to filter the install list for ‘openssl’, and then I needed to select each entry for install.  It was all a bit clunky and cryptic, and the installer seemed to crash a couple times.  But it did install (with a bunch of other stuff too apparently).

Run Code:

These are my steps, which more or less follow ckamath’s tutorial in the above post:

  • Open a shell.
  • Browse to the \android folder where your export data is.  In my case that was:
    • C:\sketchbook\floater08\android
    • In the below examples, this is the presumed path from the shell that the code is being entered from.
  • A: Make your secret key!
  • Create the ‘secret key’ that is required for signing your application:
    • Here is a template of what to type:
      • \android>keytool -genkey -v -keystore <SKETCHNAME>-release-key.keystore -alias <YOURNAME> -keyalg RSA -keysize 2048 -validity 10000
    • This is what I typed:
      • \android>keytool -genkey -v -keystore floater08-release-key.keystore -alias AKEric -keyalg RSA -keysize 2048 -validity 10000
  • It will then ask you several question like “What is your first and last name?”, What is the name of your City or Locality?”, etc.
  • When its done (successfully) it will finish by printing:
    • [Storing floater08-release-key.keystore]
  • And will store the corresponding file:  \android\floater08-release-key.keystore
  • B: Create ‘unsigned .apk’
  • Execute ant to build the unsiged apk:
    • \android>ant release
  • This should spit out a bunch of stuff in the shell.  When complete you should see something like:
    • BUILD SUCCESSFUL
      Total time: 18 seconds
  • If you didn’t have one before, you should now have a \bin folder with the unsigned apk in it:
    • C:\sketchbook\floater08\android\bin\floater08-unsigned.apk
  • C: Sign the unsigned .apk with the secret key:
  • Here is a template of what to type:
    • \android>jarsigner -verbose -keystore <SKETCHNAME>-release-key.keystore <FULL PATH TO>\android\bin\<SKETCHNAME>-unsigned.apk <YOUR NAME FROM SECRET KEY STEP>
  • This is what I typed:
    • \android>jarsigner -verbose -keystore floater08-release-key.keystore C:\sketchbook\floater08\android\bin\floater08-unsigned.apk akeric
  • The shell should have several lines of “adding” and “signing”.
  • D: Verify that jarsigner did its thing:
  • Here is a template of what to type:
    • \android>jarsigner -verify <FULL PATH TO>\android\bin\<SKETCHNAME>-unsigned.apk
  • This is what I typed:
    • \android>jarsigner -verify C:\sketchbook\floater08\android\bin\floater08-unsigned.apk
  • If this works you should see in the shell:
    • jar verified.
  • E: Make signed (and distributable) apk file:
  • Here is a template of what to type:
    • \android>zipalign -v 4 <FULL PATH TO>\android\bin\<SKETCHNAME>-unsigned.apk   <SKETCHNAME>.apk
  • This is what I typed:
    • \android>zipalign -v 4 C:\sketchbook\floater08\android\bin\floater08-unsigned.apk   floater08.apk
  • The shell will start by saying:
    • Verifying alignment of floater08.apk (4)…
  • Print a bunch more stuff, and finally:
    • Verification successful
  • You’ll now find a <SKETCHNAME>.apk file in your \android directory:
    • \android\floater08.apk

That apk is now directly consumable by an Android device.  As a test I put it on my ftp, browsed to it from my phone, and it installed immediately.

The next step would be to get it on the Android market, but I’ll work in that in another post.  Happy Holidays!

Go to part 5…, part 7…