Archive for the ‘ Electronics ’ Category

Raspberry FM Part 2, the sequal

Nearly a year ago I wrapped up a project I called “Raspberry FM“:  A Raspberry Pi based internet radio streamer coupled with a MaKey MaKey as the interface.   Why the name Raspberry FM?  It’s a mashup of a Raspberry Pi, and my favorite internet radio station, Soma FM.   It worked, but had a few problems:

  • There was no visual feedback, the MaKey MaKey was purely an input.
  • I was having a hard time getting Python to interface with with MPlayer (probably due to my own ignorance), the audio player I had chosen, so everything was done via bash.

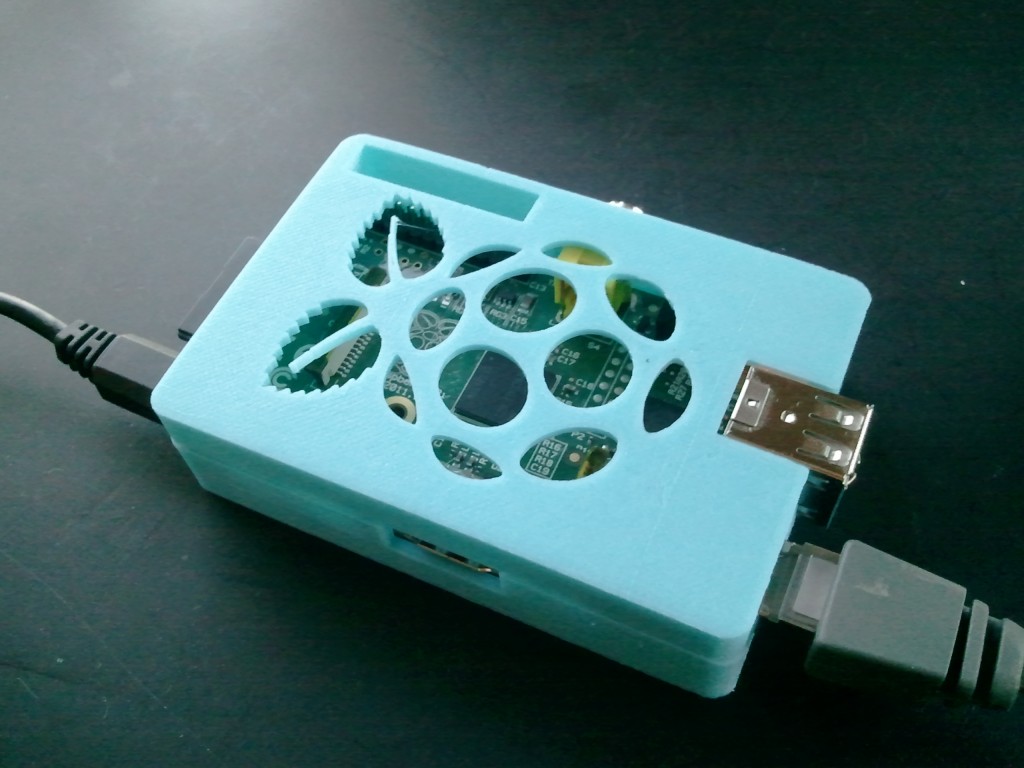
Fast forward nearly a year:  After learning about the Mpd audio player/server, and (one of) its clients Mpc, it re-piqued my interest in programming a Python app to play music on the Pi.  Second time around, it all turned out really well:  New software combined with new hardware and a 3d-printed case turned it into a good looking compact unit.

Overview of the whole process below (pic on top, video on bottom).  During the development I decided to write my own Python music player around mpc & Adafruit’s LCD library.  At this point there are several others online, but I enjoyed coding it from scratch.

adaLcdCase

Raspberry FM Features:

  • Auto-on with the Pi
  • If no internet is present or it drops out, app will go into holding pattern until it returns.
  • Can change between any number of stations. (left\right buttons).
  • Stations are easy to add via the commandline:  No need to update Python source: SSH into the Pi, and add\remove what you need.
  • Increase\decrease volume (up\down buttons).
  • Station and song info is displayed and auto-scrolls.
  • Shutdown Pi  (select+left) or turn off program (for debugging, select+right)
  • Lots of color changing when buttons are pressed!

Hardware needed:

  • Raspberry Pi (I used a B model)
  • Adafruit RGB 16×2 LCD+Keypad Kit : Solder and install!
  • Optional:  Custom 3D printed case I designed (well, I designed the top part), download on Thingiverse.  Print & install!  Took me about an 1:20 on my Makerbot Replicator (1).
  • I stream the internet radio over cat5, but I’ve also had success with wifi.
  • I use the headphone jack for audio out.

Software needed:

  • This was all done on the Raspbian distro via NOOBS.
  • My “Raspberry FM” Python program.  Find on Bitbucket.
  • You’ll need Adafruits CharLCDPlate library.
  • FYI, I coded this all via the Adafruit WebIDE, I’d recommend anyone else to use it as well to help manage the various Python modules on the Pi.
  • MPD & MPC:  sudo apt-get install mpc mpd

Steps:

  • I presume you already have your Pi setup.  If not, see my notes here on the general steps needed to get a Pi live and kicking.
  • Setup Pi to auto-login.  See notes here.
  • Download the Raspberry FM Python program to a folder of your choosing.  Since I coded this via the WebIDE, both the creation of my code and the integration of the Adafruit LCD modules was all handled via the WebIDE.  Make sure you download all the Adafruit CharLCDPlate modules as well and put them in the same directory.
  • Install MPD & MPC.
  • Add stations to MPC.  This is super easy on the commandline.  May I recommend anything from SomaFM?
    mpc add http://ice.somafm.com/groovesalad
  • Setup Pi to auto-run a program on start.  See notes here.  You will point that script to wherever you saved the Raspberry FM Python script.  For example, my startup.sh script looks like:
  • #!/bin/bash
    echo startup.sh : Launching raspberryFm.py
    sudo python /usr/share/adafruit/webide/repositories/my-pi-projects/Adafruit_CharLCDPlate/raspberryFm01.py
  • Restart the Pi and listen to the music!

The final result in action:

Playing with the Raspberry Pi’s camera

I recently picked up a camera module for the Raspberry Pi from Adafruit.  This post will serve to be notes to myself on how to use the dang thing.  There’s a lot of info on the web, so I’m going to collect what’s applicable to myself here.  This post will continue to evolve over time.

Note, I’m using a Macbook Air, so all software and commands are centric to OSX (10.8.5).

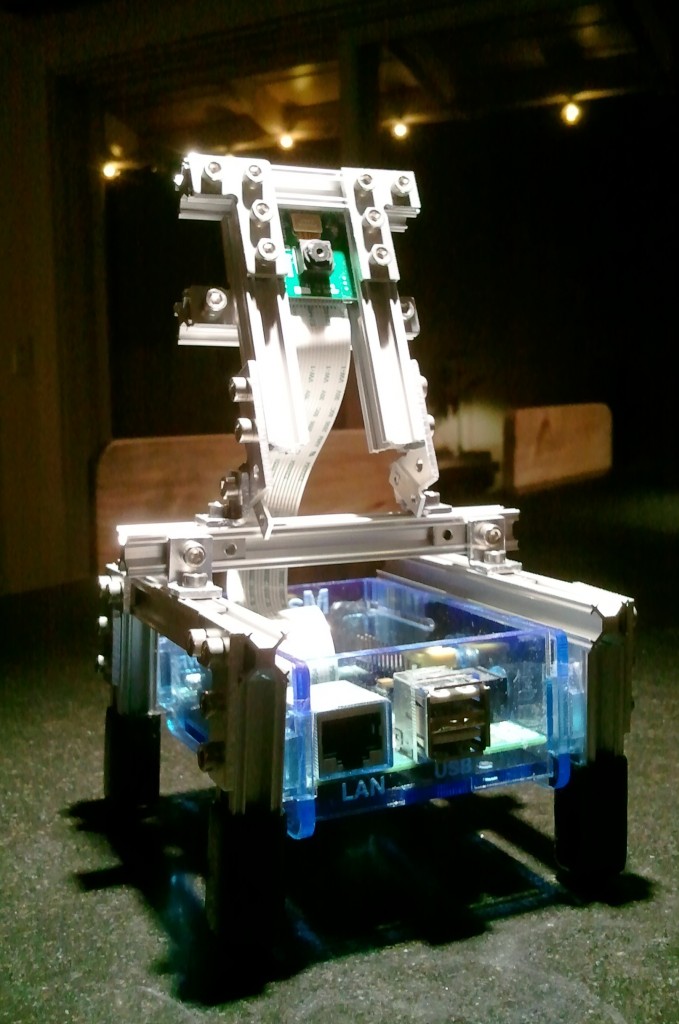
First off, you need some sort of stand for it.  I made one that should survive the Zombie Apocalypse out of some MicroRAX:

SAMSUNG

First Time Setup:

Based on the latest installation of Rasberian via NOOBS, the hardware installed easily, and was auto-detected by the Pi.  First time setup can be found here on raspberrypi.org.

Documentation:

Official documentation can be downloaded off of Github.  The first time setup above covers many basics.

Camera forum can be found here.

Capturing and Viewing:

Important note:  You can’t view anything over VNC, and obviously you can’t do it via a ssh terminal.  This post explains the reasons behind it.  This is however, a bummer:  To run any of the “demo” code, you need to be viewing the Pi directly over hdmi.

Super Simple Commands:

You’ll find these on all the sites:

$ raspistill -o image.jpg
$ raspivid -o video.h264
$ raspivid -o video.h264 -t 10000

1 : Capture an image
2 : Capture a (5 second, default) video, at 1920×1080 (1080p)
3 : Capture a 10 second video (in milliseconds)

Viewing a video stream from the Pi on your Mac:

Need to instal mplayer on the Mac so you can access it from the command-line.  The best luck I had was to install it via macports.

$ sudo port selfupdate
$ sudo port install mplayer

Now, thanks to a post by spudnix from this thread, here’s how you can stream video from the Pi to your Mac:

Mac shell code to start netcat listening to port 5001, and piping that to mplayer:

$ nc -l 5001 | mplayer -fps 31 -cache 1024 -

Pi shell code to start streaming vid and pipe it to netcat on port 5001, shooting it to the mac’s local ip:

$ raspivid -t 999999 -o - | nc 192.168.2.15 5001

There’s a few second lag, but it worked right away.  My guess is the lag is because of the full 1080p signal being broadcast.  Dropping the resolution down had some lag at first, then caught up after a few minutes, odd:

$ raspivid -t 999999 -o -w 640 -h 480 - | nc 192.168.2.15 5001

Record raw video, convert to mp4, play:

The h264 video the camera records is “raw”.  To make it easily viewable by the Pi or Mac (or other PC’s) it needs to be converted.  Thanks to this post, here’s how you can do it:

First, you need to install gpac on the Pi, then run MP4Box (part of that install) to do the convert:

$ sudo apt-get update
$ sudo apt-get install -y gpac
$ MP4Box -fps 30 -add myvid.h264 myvid.mp4

To play video on the Pi, you need omxviewer.  I think it may come installed iwth NOOBS now(?), but if not:

$ sudo apt-get install omxplayer

Then play in a window (again, this doesn’t work over VNC, need to be on a monitor connected to the Pi) or to the HDMI port:

$ omxplayer myvid.mp4
$ omxplayer -p -o hdmi myvid.mp4

Copy data from the Pi to the Mac:

Once you record a nice video, how do you get it to your PC?  Presuming you have a ssh connection, execute this from a shell on your Mac, to copy the data from the Pi, to the Mac:

$ scp user_name@the_pi_ip:/path/to/source/file/on/pi /path/to/destination/file/on/pc

For example:

$ scp pi@192.168.2.27:~/piVid.mp4 ~/macVid.mp4

Broadcast video to the Internet:

Using VLC

Thanks to this post, I was able to get the Pi cam streaming to the web, and viewable on my Mac (via the “middle” option they described).  It wasn’t entirely straight forward though, so these are the steps I went though:

Install VLC:

On the Pi, it’s easy:

$ sudo apt-get install vlc

On the Mac, at first, I tried to install it via Macports like so:

$ port install vlc

It took forever.  And while vlc was then available at the command line, it kept giving me missing plugin errors.  I found a App for it in my downloads folder (which I moved to Applications) and tried via the gui to “File -> Open Network…” : But it wouldn’t recognize the stream from my Pi (info below).  Soooo, I went to the official download page here, installed the App that way, and it started working!

Port Forward the Router:

I accessed my routers web page 192.168.x.x and via the “virtual servers” option, opened up port 8554 for outside listening.  I’m sure this process can vary widely per router.

Stream from the Pi:

After ssh’ing into the Pi, I executed this to start the video stream (note I knocked down the resolution from the default 1080p):

$ raspivid -w 640 -h 480 -o - -t 9999999 |cvlc -vvv stream:///dev/stdin --sout '#standard{access=http,mux=ts,dst=:8554}' :demux=h264

View via VLC:

I accessed “What’s My Ip” to find the external IP of my router.

Launching VLC, I accessed “File -> Open Network…”, and entered:

http://<ip of my router>:8554

And hit “open” :  Next popped up a (delayed by about 5 seconds) stream from my Pi’s cam.  Awesome.

Using MJPG-Streamer

It’s slightly more involved, but this tutorial shows how to broadcast video straight to a web page via MJPG-Streamer. All things considered, it’s really easy to setup.  I followed the tutorial my Miguel Mota, and it worked the first time I tried.  Nice!  :  “Raspberry Pi camera board video streaming

Miguel made two shell scripts, start_stream.sh & stop_stream.sh that handle all the heavy lifting of starting and stopping all the services:  Make a copy of them to your home dir for easy execution.  Note, I changed them to up the resolution, jpg quality, and add a password to the site.  I only made one change:  Since I previously port-forwarded port 8554, I also changed their code to use that port, rather than 9000.

To add your own password, edit start_stream.sh and change the line including the block of code below to include the “-c” stuff shown here, changing myUserName:myPassword appropriately.  Note, the -c argument must be inside the quotes, after the www, or things won’t work so well.

-o "output_http.so -p 8554 -w /opt/mjpg-streamer/www -c myUserName:myPassword"

Then browse to:

http://<ip of your router>:8554/stream_simple.html

To login and start watching from the auto-generated web page!  Looks like I’m getting around 1fps.

raspistill Image Formats

--encoding <format>

The default is jpg, but you can change it, where <format> is jpg, bmp, gif, & png.  From the docs: “Note that unaccelerated image types (gif, png, bmp) will take much longer to save than JPG which is hardware accelerated.”

If using jpg, you can set the quality via:

--quality #

Where # is a value from 1 -> 100.  They say that 75 is a good number.

Python Bindings

 picamera

Here on PyPi.  Official documentation here.  Source on Github here.  Forum discussion here.

Easy to install with pip:

$ sudo pip install picamera

I’ve successfully ran the quickstarts via Adafruit WebIDE successfully (while having the Pi hooked up over HDMI to preview the results).

picam

Homepage here.  Source on over on Github.  It returns PIL Image objects.

$ sudo pip install https://github.com/ashtons/picam/zipball/master#egg=picam

Project Links:

Control your Arduino via Python with your Raspberry Pi

I recently ran across the nanpy library for Python when looking at different internet radio projects using the Raspberry Pi.  It allows you to easily control your Arduino from Python, and it installs on the Pi in a snap:

First, install Arduino:

$ sudo apt-get install arduino

Next, install the nanpy source:  This is needed to later build the new Arduino firmware:

$ cd ~
$ curl -O https://pypi.python.org/packages/source/n/nanpy/nanpy-v0.8.tar.gz
$ tar xvf nanpy-v0.8.tar.gz
$ rm nanpy-v0.8.tar.gz

Now install the required Python libs:

$ sudo pip install nanpy
$ sudo pip install pyserial

Hook up your Arduino to one of the Pi’s USB ports, and create/upload the new firmware (using an Arduino Uno as an example):

$ cd ~/nanpy/firmware
$ export BOARD=uno
$ make
$ make upload

From there, programming my Pi via the Adafruit WebIDE (and with my Arduino hooked up to a breadboard with the required led’s and resistors),  I recreated a few basic Arduino sketches to see how it worked.  It worked as expected, simple and easy.

Here is a port of the basic Arduino Blink sketch:

from nanpy import Arduino as A
led = 13

# SETUP:
A.pinMode(led, A.OUTPUT)

# LOOP:
while True:
    A.digitalWrite(led, A.HIGH); # turn the LED on (HIGH is the voltage level)
    print "blink on"
    A.delay(1000); # wait for a second
    A.digitalWrite(led, A.LOW); # turn the LED off by making the voltage LOW
    print "blink off"
    A.delay(1000);

And a port of the basic Fade sketch:

from nanpy import Arduino as A
led = 9
brightness = 0 
fadeAmount = 5

# SETUP:
A.pinMode(led, A.OUTPUT)

# LOOP:
while True:
    # set the brightness of pin 9:
    A.analogWrite(led, brightness)
    # change the brightness for next time through the loop:
    brightness += fadeAmount
    # reverse the direction of the fading at the ends of the fade: 
    if brightness == 0 or brightness == 255:
        fadeAmount = -fadeAmount
    # wait for 30 milliseconds to see the dimming effect 
    A.delay(30)

Only a few core libraries are currently supported.  To see the list, you can visit this page.

On a side note I should point out I went to great lengths to get this working on my Mac, without a lot of success.  You can check out my Python Wiki post on it, under the “Mac Notes” section.

Refresh your Pi

It seems like I use my Raspberry Pi just often enough to forget everything about how I set it up the previous time.  Unlike an Arduino, it’s possible all sorts of new configuration \ updating will need to take place if it’s sat for a few months.  This post will serve mainly a notepad to myself on what I need to do to get it up and running again, and info on how to do fresh installs.

I’m sure this all can vary widely from user to user and Pi to Pi.

Great Linux/Unix command-line cheat-sheet: Web Site, PDF.

First Time Setup Guides

Just in case you do need to do everything from scratch:

The overall gist is:

  • Format SD
  • Download Linux distro and install on card
    • Most recently, I used Pi Filler (looks like Mac only)  : It does both the format and install.
    • Look here for other solutions.
  • Once the pi is up and running, via the settings menu:  (run > raspi-config to get there from the commandline)
    • Expand the root partition:  This is only needed for older distro installs.  If you’re using NOOBS, it should be auto-expanded.
    • Set screen overscan (if wanted)
    • Configure keyboard
    • Change password (if wanted)
    • Set locale, timezone
    • Enable ssh & boot behavior
  • Optionally you can then try to make a new user, but I’ve not found a need yet.  And when I do it, I tend to screw it all up permission-wise.
  • Install VNC (so you access the Pi’s gui remotely)

Linux Distros

I’m the last person you want to ask about which distro to use, but the two main one’s I have used are Raseberian, and Occidentalis.  Rasberian is now installed as part of NOOBS, and it’s a much easier install than in the past.

  • NOOBS : From the page:  “We recommend that first-time Pi users start by downloading and installing our New Out of Box Software (NOOBS) onto a 4GB (or larger) SD card. On first boot, this presents you with a choice of operating systems to install, including Raspbian, Pidora and two flavours of XBMC. Once you have installed an operating system, you can return to the NOOBS interface by holding down shift during boot; this allows you to switch to a different operating system, or overwrite a corrupted card with a fresh install of the current one.”
  • Occidentalis : From the page : “Our distro is based on “Wheezy” but comes with hardware SPI, I2C, one wire, and WiFi support for our wifi adapters. It also has some things to make overall hacking easier such sshd on startup (with key generation on first boot) and  Bonjour (so you can simply ssh raspberrypi.local from any computer on the local network)”

Get into the Pi

It’s been a while, how do I do that?  I forgot where my  surplus usb keyboard is & the wifey is using the spare hdmi cable…

(To do a first-time setup of SSH & VNC, see the post, “Connecting the Mac to the Pi“)

First, SSH:

This will let external machines talk to the Pi.  The primary way I interact with the Pi.
Connect the pi to the network (I use cat5).
There’s a good chance the dynamic ip has changed.  From another computer, access the router and click on the ‘DHCP Client List’ to find the new ip of the Pi.
Or, if you have the Pi plugged into a monitor \ keyboard, you can enter the below command, and look for the “inet addr”

$ sudo ifconfig

Open a shell.  ssh into the Pi:

$ ssh <pi ip address> -l <userName>

Enter password.  Hopefully it lets you in…

This can fail though on a new install.  I get this on my mac:

@@@@@@@@@@@@@@@@@@@@@@@@@@@@@@@@@@@@@@@@@@@@@@@@@@@@@@@@@@@
@ WARNING: REMOTE HOST IDENTIFICATION HAS CHANGED! @
@@@@@@@@@@@@@@@@@@@@@@@@@@@@@@@@@@@@@@@@@@@@@@@@@@@@@@@@@@@
IT IS POSSIBLE THAT SOMEONE IS DOING SOMETHING NASTY!
Someone could be eavesdropping on you right now (man-in-the-middle attack)!
etc...

If this happens, lower down in the error it will have this line:

The fingerprint for the RSA key sent by the remote host is

And right below that, is an address.  Copy that address, browse (on the mac) here:

/Users/<userName>/.ssh/known_hosts

Edit that file (known_hosts), and find the section starting with the local ip of your pi.  At the end of that section, add a ‘+’, then paste in the address copied above.

When you try to re-ssh back in, it will ask you if you want to add this new host, and say “yes”.  Enter the password, and you should be good!

Copying files over SSH:

Once you have a ssh connection, you can copy data from one machine to another.

From a terminal on your PC (in my case, a Mac):

Copy data from the Pi to the PC:

$ scp pi@you_pis_ip:/path/to/source/file/on/pi /path/to/destination/file/on/pc

For example:

$ scp pi@192.168.2.27:~/piVid.mp4 ~/macVid.mp4

Copy data from your PC to the Pi:

$ scp /path/to/source/file/on/pc pi@you_pis_ip:/path/to/destination/file/on/pi

For example:

$ scp ~/macVid.mp4 pi@192.168.2.27:~/piVid.mp4

I should note that I’ve not got this to work over SSH from a terminal on the Pi.  But once a ssh connection is open, I can execute these from a terminal on my Mac just fine.

Copying files via SFTP

If you want a more robust solution to copying files to\from the Pi, SSH File Transfer Protocol (SFTP) is a good solution. The post HERE by Trevor Appleton covers how to set it up using FileZilla.  Provides a super easy way via the FileZilla gui to drag & drop files.

Second, VNC:

Once you’ve ssh’d in to the Pi, optionally you can access the desktop via VNC.

If not yet installed, install it:

$ sudo apt-get install tightvncserver

Then start the server:

$ vncserver :1

To start the server.
On your other PC, access the VNC Viewer app.
Set the VNC server address to <pi ip address>:1
Connect:  You should see your Pi’s desktop on your PC.

Update Pi Configuration

Not always needed, but if you need to access the global configuration on the pi, from the shell enter:

$ raspi-config

When done, if a reboot is needed:

$ sudo reboot

Optionally, to safely shutdown the Pi (rather than just unplugging it, which I’m told can be hard on the sd card) :

$ sudo shutdown -h now

Auto Login

Check out the post here:  Raspberry Salad Part 3: Auto-run program on startup

General linux commands

  • ifconfig : network info
  • pgrep <process name> : Return the process id
  • kill <process id> : delete the process
  • lsusb : Get attached usb device info

Setup WiFi

Adafruit has a good overview here.  Note that their section on “Setting up WiFi with the graphic interface” works, but the Pi will only start using WiFi when the gui is up.  If you want wifi to be there at the commandline as soon as the Pi boots, you need to follow their  “Setting up WiFi with the Command Line” tutorial.

Note, I’ve needed to have the pi connected to a monitor\keyboard\mouse to get this setup properly.   Having the Pi hooked up over lan and ssh’d in seems to override the WiFi with the lan, and I can’t get the IP.  Maybe I’m not smart enough.

Check to see if it’s working:

$ ping google.com

BUUUUT, I’d had problems with loosing connection over wifi.  After getting a tip from this thread, I added this line:

wireless-power off

to

/etc/network/interfaces

But that didn’t help anything.  So then I tried the recommendations from this thread (since it’s based on the chipset of the wifi dongle I got from Adafruit) to:

$ sudo nano /etc/modprobe.d/8192cu.conf

and add this code to it:

# Disable power management
options 8192cu rtw_power_mgnt=0

But after a reboot, it still didn’t work well.  In fact it got even harder to ssh in, it would constantly “Operation timed out”.  So I decided to connect the wifi dongle to my powered usb hub.  When I removed it from the Pi, it was really hot:  Power issues?

After plugging the wifi dongle into the  powered hub, and the hub into the Pi, nothing seemed to be working.  I had to power it on\off twice (over lan).  Bu by the 3rd time the wifi dongle started blinking, apparently recognized.  From there I set the Pi to pinging google. com, and my mac to ping the Pi.  So far, so good, internet radio is streaming.

So it looks like the Pi can’t provide enough, or stable enough power to the wifi dongle over it’s own usb port?   That seems… really annoying.

FINALLY, I bought a new wifi dongle:  It worked immediately.  So lesson to you all.  If you have these problems, spend $10 and get a new dongle…

Setup Camera

This post from raspberrypi.org covers it all.

A really good tutorial covering how you can capture raw  h264 videos, convert them to mp4, the play them on the Pi can be found here: Capturing HD Video With The Pi Camera Module.

And, my own setup guide here: “Playing with the Raspberry Pi’s Camera

Software Update

I use the apt-get package manager.

Update your cache:

$ sudo apt-get update

Search the cache for software:

$ sudo apt-cache search <someString>

Upgrade all the software on the Pi (can take a while… hours…)

$ sudo apt-get upgrade

Install new software:

sudo apt-get install <package>

Remove old software.  remove can leave some dependencies behind, purge deletes it all.

$ sudo apt-get remove <package>
$ sudo apt-get purge <package>

Adafruit WebIDE

The Adafruit WebIDE is a great way to program on the Pi from some other computer over ssh.  All the code is managed in the cloud via Bitbucket.   Setup guide HERE.

The general process is:

Note if you’re ‘refreshing’ an old Pi, the WebIDE may no longer recognize it.  In that case, log into your Bitbucket account, and in the “Manage Account -> Integrated Applications” menu, remove any “Consumers” and “OAut Consumers”, and then follow the setup guide to create a new one.

Packages

Scratch-pad area of different packages used based on projects I’ve done, or learned about, and probably forgotten about.

To get a list of all the packages installed:

$ dpkg -l

This post has a great overview of many packages to install: Linux & Python Packages for my Raspberry Pi

Presuming you have pip installed, you can use this to get a list of all Python packages installed:

$ pip freeze --local

Audio

Thanks to this post, I learned about these first three apps:

Alsamixer

$ alsamixer

Alsamixer is part of the distro, and has a simple command-line interface & gui.  Gives you a simple way to adjust volume, etc.

MPD & MPC

MPD is the “Music Player Daemon”.  From the page it is “an audio player that has a server-client architecture. It plays audio files, organizes playlists and maintains a music database all while using very few resources. In order to interface with it, a separate client is needed.”

One of those clients is MPC.  It is “a minimalist command line interface to MPD, not to be confused with musepack.”

To install the two at once:

$ sudo apt-get install mpc mpd

To add internet stream(s) to play (Let’s play some Groove Salad):

$ mpc add http://ice.somafm.com/groovesalad

To play a specific stream:

$ mpc play 1

MPlayer

I used MPlayer as part of my Raspberry FM internet music streamer.

Install:

$ sudo apt-get install mplayer

Play a stream:

$ mplayer http://streamer-dtc-aa01.somafm.com:80/stream/1018

Lot more MPlayer configuration from this post : “Raspberry Salad Part 2: Raspberry FM

Games

Minecraft Pi

Why wouldn’t you want to play Minecraft on you Pi?

Note, Minecraft Pi doesn’t work for me over VNC:  The application launches, but all I see is a black window.  You need to have the Pi directly connected to a monitor/keyboard/mouse.

FYI, it needs to be ran via the XWindows gui mode, so be sure to launch it first via

$ startx

Open a LXTerminal window:  Download (to your home dir), install (then remove the tar), & run:

$ cd ~
$ wget https://s3.amazonaws.com/assets.minecraft.net/pi/minecraft-pi-0.1.1.tar.gz
$ tar -zxvf minecraft-pi-0.1.1.tar.gz
$ rm minecraft-pi-0.1.1.tar.gz
$ cd mcpi
$ ./minecraft-pi

Python

First off, be sure to get pip installed:

$ sudo apt-get install python-pip

Once that’s installed, you can use pip to pull down all other Python packages needed.  This is preferred to using apt-get, this  post does a pretty good job of explaining why.  That being said, I’ve been unable to use pip to install certain packages (like matplotlib), and apt-get works fine.  However, once installed by apt-get, pip recognizes them.

See what Python packages you have installed:

$ pip freeze

RPi.GPIO

You’ll need this to access the Pi’s GPIO pins in Python:

$ sudo pip install RPi.GPIO

pyserial

$ sudo pip install pySerial

PIL

I’ve been unable to get PIL installed via pip.  But apt-get seems to work:

$ sudo apt-get install python-imaging

scipy

Again, pip fails for some reason.

$ sudo apt-get install python-scipy

OpenCV

This wil install OpenCV, and the Python bindings:

$ sudo apt-get install libopencv-dev python-opencv

Some links:

Other Hardware

Arduino

This Instructable has a really good overview of how to instal all the necessary packages to get your Pi to talk to an Arduino: “Arduino / Raspberry Pi Internet Radio“.

$ apt-get install arduino

And other Python dependencies:

$ sudo pip install nanpy
$ sudo pip install pyserial

4WOC: Week 2

Four Weeks Of Creativity, WEEK 2!

This post will follow my ‘next 7 days of creativity’.  Back to Week 1. Forward to Week 3.

Day 14 : Sunday, Nov 25th, 2013

Kivy : Python app development

I’ve talked about Kivy in the past, but this coming week I’m going to try programming in it in ernest.  From their site, Kivy is an “Open source Python library for rapid development of applications that make use of innovative user interfaces, such as multi-touch apps.”.  They integrate many other Python libraries (like PyGame) into one cohesive whole.  Today I got the latest version installed, and loaded up some of their examples.   The biggest hurdle so far is to get it to launch in debug mode from Wing IDE (my Python development environment of choice):  I can’t seem to track down the custom Python app (I’m on a mac) that Kivy uses (on the PC this would be trivial), so currently no debugging.  I hope to get this worked out in the coming week.

Day 13 : Saturday, Nov  24, 2013

Threat Detection Sensor Mk1!

I picked up a Parallax PIR sensor a few years back at the Bay Area Maker Faire.  Always wanted to see how hard it would be to make a simple motion detector / threat detection system.  Turns out, if you have the right components, it’s really easy.

Here is the prototype in action:  Having detected me, the bright blue threat LED is on, and if you were present, you’d hear the threat audio “shave and a haircut, two bits” playing:

Components:

  • Arduino Uno (I’m sure any Arduino will work)
  • Parallax PIR sensor
  • 8ohm speaker
  • LED of your choice plus resistor (100-200 ohm)
  • Breadboard & connectors
You can download the code I made here:  It’s a mashup of these two example sketches:
Total time:  Little over an hour.
If I had the time and components to take this project further I would:
  • Allow it to be plugged into a wall, on a battery backup (in case the baddies cut the power).
  • Send me a text whenever a threat is detected.
  • Attach a simple camera to snap a picture of the threat for later retrieval.
  • Have it know what time it is when the threat happened.

Day 12 : Friday, Nov 22, 2013

Creative fail.  Completely exhausted after work, feel like I’m coming down with something.  No creativity :(

Day 11 : Thursday, Nov 21, 2013

More 3d printing : My wife has her own business selling the knitted and crocheted items she makes.  I’ve designed and printed out small round ‘chits’ with her initials that she can sew into the items .  Check out her stuff over on Etsy.

Printing in process!

Day 10 : Wednesday, Nov 20th, 2013

I modeled my house in Minecraft.  ’nuff said.  (this actually took more than one day, I just finally finished it)

Day 9 : Tuesday, Nov 19th, 2013

3D Printed ShapeShifter Vase

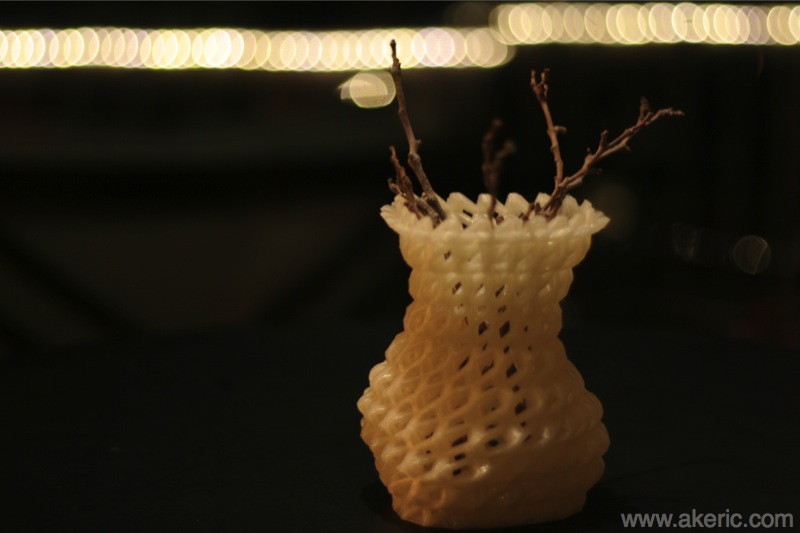
I ran across a site called http://shapeshifter.io that makes it really easy to create 3d printable items like vases, bowls, etc.  10 minutes later and I had the below vase done.  17h and 15 min later the print finished on my  Makerbot Replicator.

Find out more info and download the model over on Thingiverse.


Day 8 : Monday, Nov 18th, 2013

Pickled Peppers!

I picked up 20 jalapeños  at the farmer’s market on Sunday.  Didn’t know what I should do with them.  After searching the web for recipes, I found this one:  Easy Homemade Pickled Jalapeños.   I happened to have all the ingredients and hadn’t ever pickled anything before… ever… so why not?  As you can see from the recipe, it’s quite easy, and it worked for me without a hitch.  That being said, they are hot.  The farmer I bought them from had a smirk when he told me “they’re hot”.  Heck, I like hot things, I can chug Tabasco.  But these are step up, for sure.  I can eat one… then drink a lot of water… then try another… maybe.  I put the end result in a old moonshine mason jar, seemed a fitting end for that glass :)  Whole process took only about an hour.


In order:  The ingredients, soaking in the brine, and bottling.